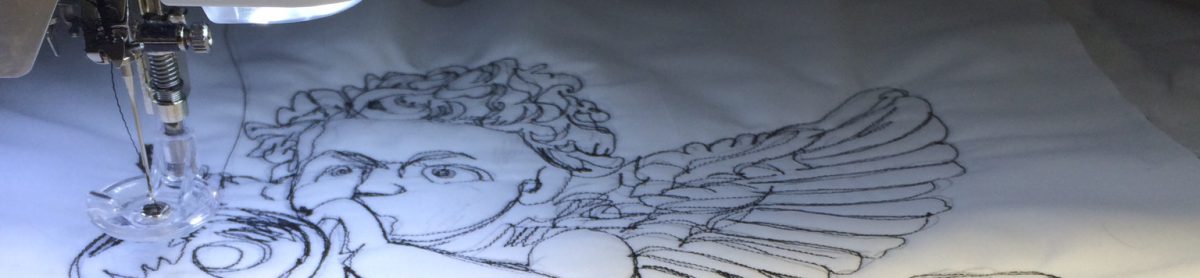
Free Motion Quilting Project – This is probably the best site for learning free motion quilting that I can think of. Leah Day clearly explains what she is doing, how to do it yourself and she has Craftsy classes too. She has done tons of online examples. She recently started publishing her designs in books, so if you are a person who prefers to browse books for ideas, she is there for you too.
You also might want to follow along with Leah’s Building Blocks Quilt Along. You can find it on Facebook and her website that I linked to above.
Books
You can get it on Amazon here Free Motion Quilting by Kent Mick BookThe book the store did not have in stock because they sold out. I highly recommend this for a beginner or never ever free motioned before person. It is a short book at only 32 pages. Don’t be fooled though. It gives you exactly what you need and nothing more. No silly same old filler pages like so many other quilting books have now days.
Free Motion Quilting On Your Home Sewing Machine by Kent Mick. You can get it on Amazon or at almost any large quilt shop. It should be $12.95 or under.
Books I passed around class: Free Motion Quilting From Feathers to Flames by Leah DayFree Motion Quilting From Feathers to Flames by Leah Day is available on kindle and as a regular book.. She has a DVD and other books available too. I call this Leah’s red book. It is a great portable spiral bound smaller sized book full of examples. Wonderful textures of feather and flame designs. I use this for inspiration often. She includes over 50 designs and instructions. She also shows how to transform a simple design into something more complicated looking by just changing it up a bit. I love this book.
Quilt Savvy: Gaudynski’s Machine Quilting Guidebook by Diane GaudynskyQuilt Savvy: Gaudynski’s Machine Quilting Guidebook by Diane Gaudynski has great examples photos. It is in a vertical format so easy to carry around to retreats or keep by your machine. This book as great trouble shooting tips. Want to know why you have little wads of thread at your points? She tells you. I think this book is very wordy if you think it’s just a reference guide. It isn’t. She gives lots of advice on many aspects to machine quilting (aka free motion).
For those of you who are taking my class. Here is a link to the pdf which contains the list of supplies and pre-work that you will need to do in order to be ready for the class.
If you have several feet that might work (see pdf) and don’t know which one is best, bring them all. we can talk about them in class.
What a week! Fall is here! It was 97 F yesterday and 80 F today with rain most of it. I almost got naked and did a thank you rain dance. I’m sure my neighbors were thankful because I rescued them from the ghastly vision of my interesting bits by deciding to go shop hopping instead. It was much more important grab two more shops on the Quilts Across Texas Shop Hop than it was to frighten the rain gods into dumping more water on me in an effort to make put my clothes back on. We got plenty of water today.
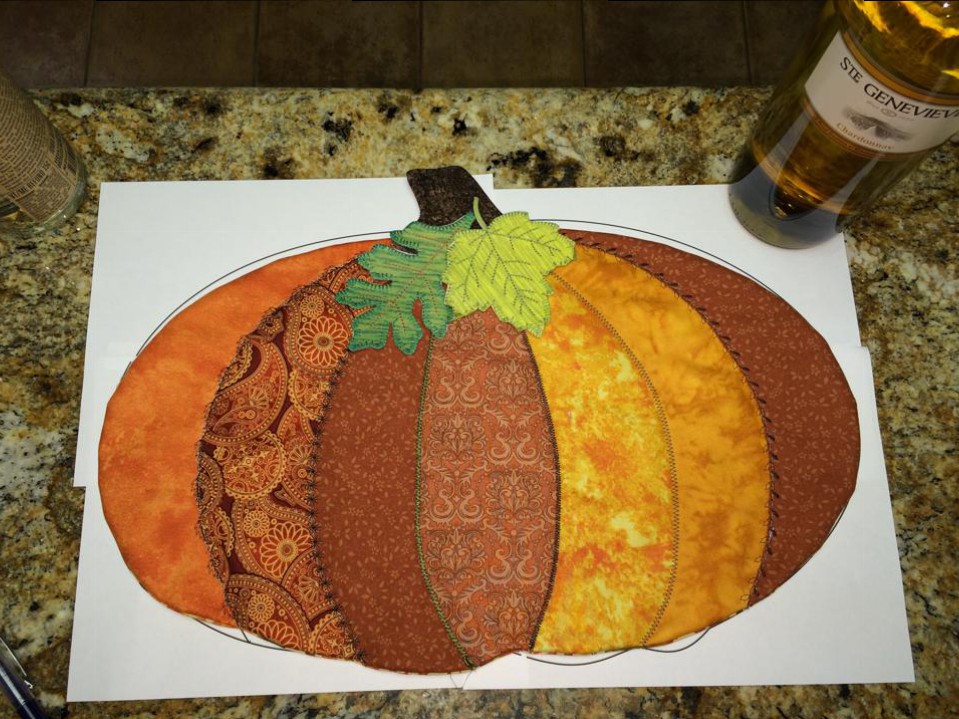
This past week my friend Jamie reposted a photo of a class sample that I did back in June. She showed off the quilt as you go watermelon table runner. Jamie got a big response from her Facebook peeps and they asked me to teach it again. I will in the spring. I offered to do something “Fall or Christmas” instead. We talked and decided a pumpkin would be very apropos for the next two months at least. So a pumpkin it is.
There are some vintage looking quilt as you go pumpkins made of strip piecing. At first I though we’d do that. It would be made just like the watermelon table runner but a pumpkin. Sounds easy. I decided to actually make a sample this time.
But as things go in my world I decided to change the plan just a bit to make things prettier.
There is absolutely nothing on a pumpkin that is a straight line. So, I decided that instead of strips, we’d do curves instead, easy-peasy no-pin mild gentle curves that would suggest the 3D shape of the pumpkin. Great! I drew out a pattern and it is beautiful! Oh no! I realized we can’t do the stitch a strip and flip it over technique as easily now. We got those curves to deal with. This is intended to be a beginner level class… so what am I to do?
I have said all year that I would teach a Fast Piece Applique class à la Rose Hughes style. It’s fun, it’s fast, it gets fabulous results in a short time. Her books are great and I tell my peeps to, “buy them, buy all of them. Rose’s books will inspire you and teach you stuff, she’s great!” I decided that this is my chance to spread the news about the greatness of Rose. However, Jamie and I did put the news out that this is a quilt as you go kind of beginner class. So what to do?
I decided we will do Rose’s technique and mangle it into a quilt as you go kind of thing and shorten the process just a bit. I put it together tonight, and because of the big pieces of pumpkin, it will work just fine. I think this is gonna excite my class! I’m excited to share it.
I was really surprised how the process fell together and how it sped up making the whole darn pumpkin centerpiece. And, best of all, it was fun and not that complicated.
I’m not going to show how I did it yet… I want to find any interesting foibles by making another sample tomorrow. For now… Here is a pic of what I did in just under an hour and 30 minutes.
I have discovered Wonder tape! Love this stuff. If you are doing a pillowcase type finish and just can’t get those pesky edges to fold in and stay aligned, wonder tape is your friend! It is two sides and tacky so you can reposition the cloth to your hearts content and when you are happy you can use an iron to fuse it down to it will stick really hard. Then you can sew it. It’s a convenient 1/4 inch wide so makes getting that seam to match with the other side of the opening you want to close really easy. After you sew it, it will seems kinda stiff with that tape in there. But it sewed easy and didn’t gum up my needle. The wonder part comes after you wash the item. The tape dissolves away and disappears leaving no trace it was ever there!
I used this in my free form table runner class yesterday and the students projects came out fabulous. Even the beginner never ever sewed before student produced a really well done project. You could not tell where the opening was that was used to turn the table runner inside out.
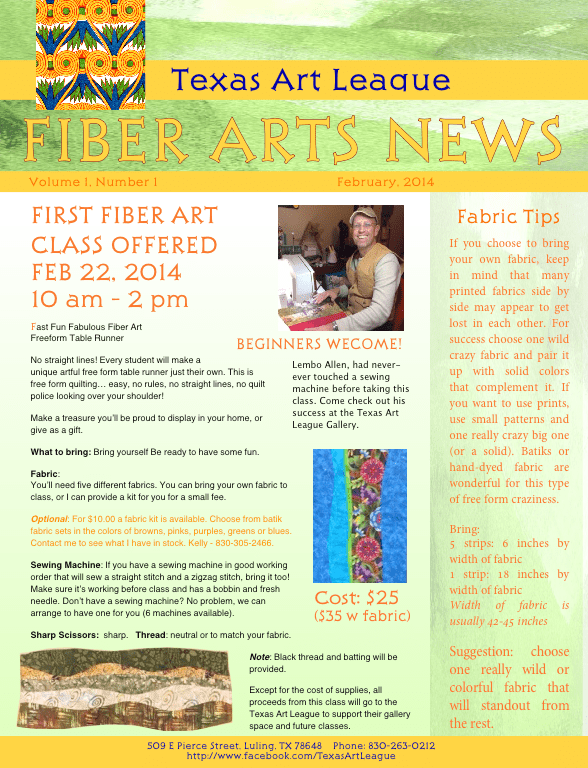
The Free Form Table Runner class being offered Feb 22, 2014 from 10 am to 2 pm. at the Texas Art League Gallery. Sign up at the Gallery. There will be a break for lunch, you can bring your lunch or some students may wish to work on their project so we arrange for lunch from the Coffee Shop, or perhaps a taco run. Iced tea and water available during the class.
Click here for PDF to save and download. For more detailed information, Please click on this image for a pdf you can save and print. This flyer will also be available in the Texas Art League Gallery; and, in the Watermelon Shop next door if the Gallery is closed.
The Gallery has limited hours but is open most afternoons Tuesday – Saturday. They would really appreciate more volunteers who would like docent at the gallery so that it may open more hours of the day.
The Texas Art League Gallery is at at 509 E Davis Street, Luling, Texas 78648.