Longarm Lesson – Backing Too Short

Stuck with a quilt back that is too short? This is how I solved the quilt backing too small but already mostly quilted on my longarm problem.

One late afternoon, the machine was humming along and everything was going really well. I’d already finished two charity quilts. Everything was perfect, I had enough backing provided in the quilt packages and I was racing through the third charity quilt I’d promised to do. Suddenly, disaster struck!

Oh NO!

Always measure your backing or you will be sorry.
Moral of this photo: Measure your backing even if a customer has always given you enough. Always measure!

Oh NO! NO! NO! NO! The quilt backing provided was too short! I literally slapped myself up side the head. How many times had I admonished new longarmers to measure everything provided before you even put a quilt on your machine?! How many times!?!

GEEZ! NOW WHAT DO I DO!?

I called my friend Carol and put on my thinking cap. After sitting and pondering together for a bit and after a refreshing glass of _______. (iced tea?) I had an epiphany. I could solve this without taking the quilt off the machine, without having to go through the agony of getting it straight again, without having to take the several hours it seemed this disaster would need.

The solution turned out to be hilarious and my friend Carol took a video. The simple solution was to take off just the bottom of the quilt and leave the top attached.

I had a tea cart that set a small sewing machine on and just sewed a strip onto the bottom of the backing. It was a quick and easy matter to just re-attach the bottom and quilt on. Watch how I did it.

Creativity and Mess, Each has a Purpose

I am often very messy in my creative process. Overtime, I found I am most creative when I just go with the flow. I can’t create or get new ideas without some mess and clutter. But there comes a time in each project when my mess is too much and I am not able to proceed. This always happens when it is time to do what I call the finishing processes, the freemotion quilting, the binding, the mounting or putting on of a hanging sleeve. When I get “stuck”  I have to pick up my work area. 

A scientist just “figured me out ” ! Her paper explains both of my behaviors. She established that “disorderly environments seem to inspire breaking free of tradition, which can produce fresh insights,” and that explains the first half when I am being creative. 

Her second conclusion that “Orderly environments, in contrast, encourage convention and playing it safe, ” makes sense too. When I get to the conventional part of my process, making it actually into a quilt, I need some order in my environment. 

So I celebrate my mess! It is what makes my work mine. And I celebrate my order, It is what helps others to understand my work.

Read about Kathleen Vohs’ Study here

Gravity Quilt – Top Completed

Two hours later and Gravity is pieced together. Wow! What a great learning experience. Julie at Jaybird Quilts did an excellent job writing this pattern. Each colored block quilt upon skills learned in the previous block. I learned so much that I will use in future quilts. And it was fun! It is not complete yet as I still have quilting and binding to do. Here is a photo of the pieced top. 

gravity quilt  pieced top
Gravity quilt pieced top ready to quilt and bind.

Gravity Quilt – background

Since Sassy Southern Sewing, I continued working on Gravity. The grey monotone background was very fast to cut. The kit provided generous amounts of extra fabric so recutting a mistake was no problem. In fact, i cut extra triangles, diamonds and hexagons with the left overs. I plan to make pillow covers with them. 


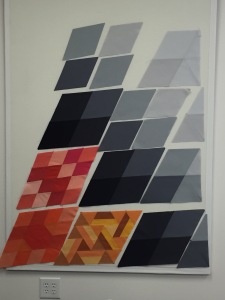
Photo of grey background pieces and blocks
Grey background pieces and blocks for Gravity Quilt cut out very fast. Pictured shows the layout for one section.
 
Putting the colored blocks and grey tone blocks together took me about 10 hours. Ten hours at a retreat with some of my favorite women in the world with good food and sangria. I could have done it in less time, but at retreat is so much more fun and I worked on it in two days instead of hours spread over weeks. 

Gravity QuiltnBlock 9 – Voyage

#Gravityquilt has been a blast so far. I’ve been at a sewing conference, Sassy Southern Sewing, this week. At night, I sew on this quilt. This block webt together really fast. It has been a nice break from the more complicated blocks 7 and 8.  Here is block 9.  


Gravity Block 9 – Voyagr

The colorful blocks of #gravityquilt are done now. Block 9 was easier than block 7 and 8. Jaybird has planned this pattern really well. After this I need to do all the grey monotone background area. Boy, do Inhave a lot of strips to cut now. 

I changed the order again. Look at the color values of the blue and orange. You’ll see how a simple change of the light to dark values really change the appearance of the block.


Gravity Block 8 – Eclipse

The Eclipse block of #GravityQuilt builds upon a previous block that had one Y seam. It looked hard at first, but I followed the instructions step by step and it just went together. I did reverse one color pair and decided to leave it. Of the pair, I think I like that block better. What do you think?


Gravity Quilt Block 7 – Cosmic

Volunteering at a sewing conference means I don’t get to sew, except in my room after dinner. The Jaybird Gravity Quilt pattern is plotted out very well. The skills you learn build upon the previous blocks. I am finding the instructions have been really well done. And, I am learning a lot. #GravityQuilt is not a boring kit, it’s actually fun. 

Here is block 7. 


Gravity Block 6 – Ultraviolet

Wow, it’s been a busy month. I’ve been home, gone, had cousins visit, made new friends, had family visit, closed a retail shop, dug into work on another one, and am volunteering for a friend who is putting on the Sassy Southern Sewing extravaganza. Not my normal type of sewing, but I am sure I’ll learn a lot helping at this garment oriented event. 

Oh yea! And I got up on water skis! For more than two seconds. I really really skied half way around the lake! Yay!

I finally made time tonight to cut and sew together block 6. This is called Ultrviolet. It requires a partially open seam that is finished at the very last. It actually went together pretty fast. Lots of bigger pieces and only two triangles in this block. There is so much bias in these pieces! I have learned that starching, or in my case using Best Press, until the fabric is like cardboard really helps this #GravityQuilt go together more quickly, requires almost no pins, if any, and helps a ton. It feels good to sew.