After a Loooooong break, I’m longarming again. My first quilt since 2019 is on the machine.
Yesterday, I unwrapped some new side clamps that I purchased in 20-something because my red snapper clamps were worn out. And, I am amazed! I wish I’d had these in 2009. Best clamps EVER!
Bonus: they have magnets in them so they hold my little tools that get lost easily. Thank you Fredrick C Hill! You are the best!
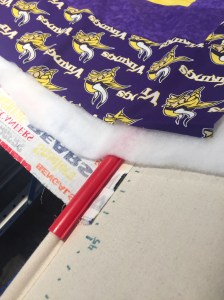
Stuck with a quilt back that is too short? This is how I solved the quilt backing too small but already mostly quilted on my longarm problem.
One late afternoon, the machine was humming along and everything was going really well. I’d already finished two charity quilts. Everything was perfect, I had enough backing provided in the quilt packages and I was racing through the third charity quilt I’d promised to do. Suddenly, disaster struck!
Oh NO!
Moral of this photo: Measure your backing even if a customer has always given you enough. Always measure!
Oh NO! NO! NO! NO! The quilt backing provided was too short! I literally slapped myself up side the head. How many times had I admonished new longarmers to measure everything provided before you even put a quilt on your machine?! How many times!?!
GEEZ! NOW WHAT DO I DO!?
I called my friend Carol and put on my thinking cap. After sitting and pondering together for a bit and after a refreshing glass of _______. (iced tea?) I had an epiphany. I could solve this without taking the quilt off the machine, without having to go through the agony of getting it straight again, without having to take the several hours it seemed this disaster would need.
The solution turned out to be hilarious and my friend Carol took a video. The simple solution was to take off just the bottom of the quilt and leave the top attached.
I had a tea cart that set a small sewing machine on and just sewed a strip onto the bottom of the backing. It was a quick and easy matter to just re-attach the bottom and quilt on. Watch how I did it.
I found these spiral eye needles about two years ago and I have fallen deeper in love with them every time I use one. Pam Turner had an idea and invested her life savings in it because she felt it was so good. I agree with her.
Her easy threading needles blow the Clover top loading (not-so-easy) needles completely away. Pam’s needles are ‘side’ loading.. get that? Side loading. That means the thread goes in from the side. The advantage is the thread isn’t pulled out of the end slot when going through the fabric because THERE IS NO END SLOT. This easy threader stays threaded.
I use this most of all for burying quilt threads on my long arm. But I multiple size of her spiral eye needles and use them for embroidering, beading and other quickie things.
The only minor problem I have found is when embroidering if I have the side slot turned towards the fabric and pull the needle through with pressure. In this situation, once in a while the fabrics weave can get caught in the slot. The advantage of not having to strain my eyes when threading far outweighs this. It’s easiliy solved by spinning the needle so the slot is not pulled against the fabric as I stitch.
As I get older, my eyes switch more slowly from distance vision to close up. Threading needles has become harder and takes longer because of it. The Spiral Eye Needle actually is faster to thread even when my eyes are focusing well. I’ve given a few of them as gifts.
These aren’t the most inexpensive needles you will ever buy, but they are the cheapest if you count the amount of time you spend threading and if your vision is a little bit off they will save you even more time.
I had a professional longarm friend tell me that the spiral eye was too expensive for her to use. I asked her how long it took her to bury threads… 10 minutes to an hour depending on thread changes… Most pros get paid by the square inch. If you could cut the thread burying time to 25% of what you spend now… how many more quilts can you get done. This is a cheap investment for a pro. And for someone like me… it’s a godsend for my eyes, sanity, and patience.
Plus I use one of those little strawberries with sharpening grit. My favorite two year old needle is just as good and sharp as the day I got it.