
Finally found a Thimble that I love at Holly Dee Quilts in Luling, Texas. It is a leather thimble with two layers of leather on the finger tip and fits me like a glove tip made for me. 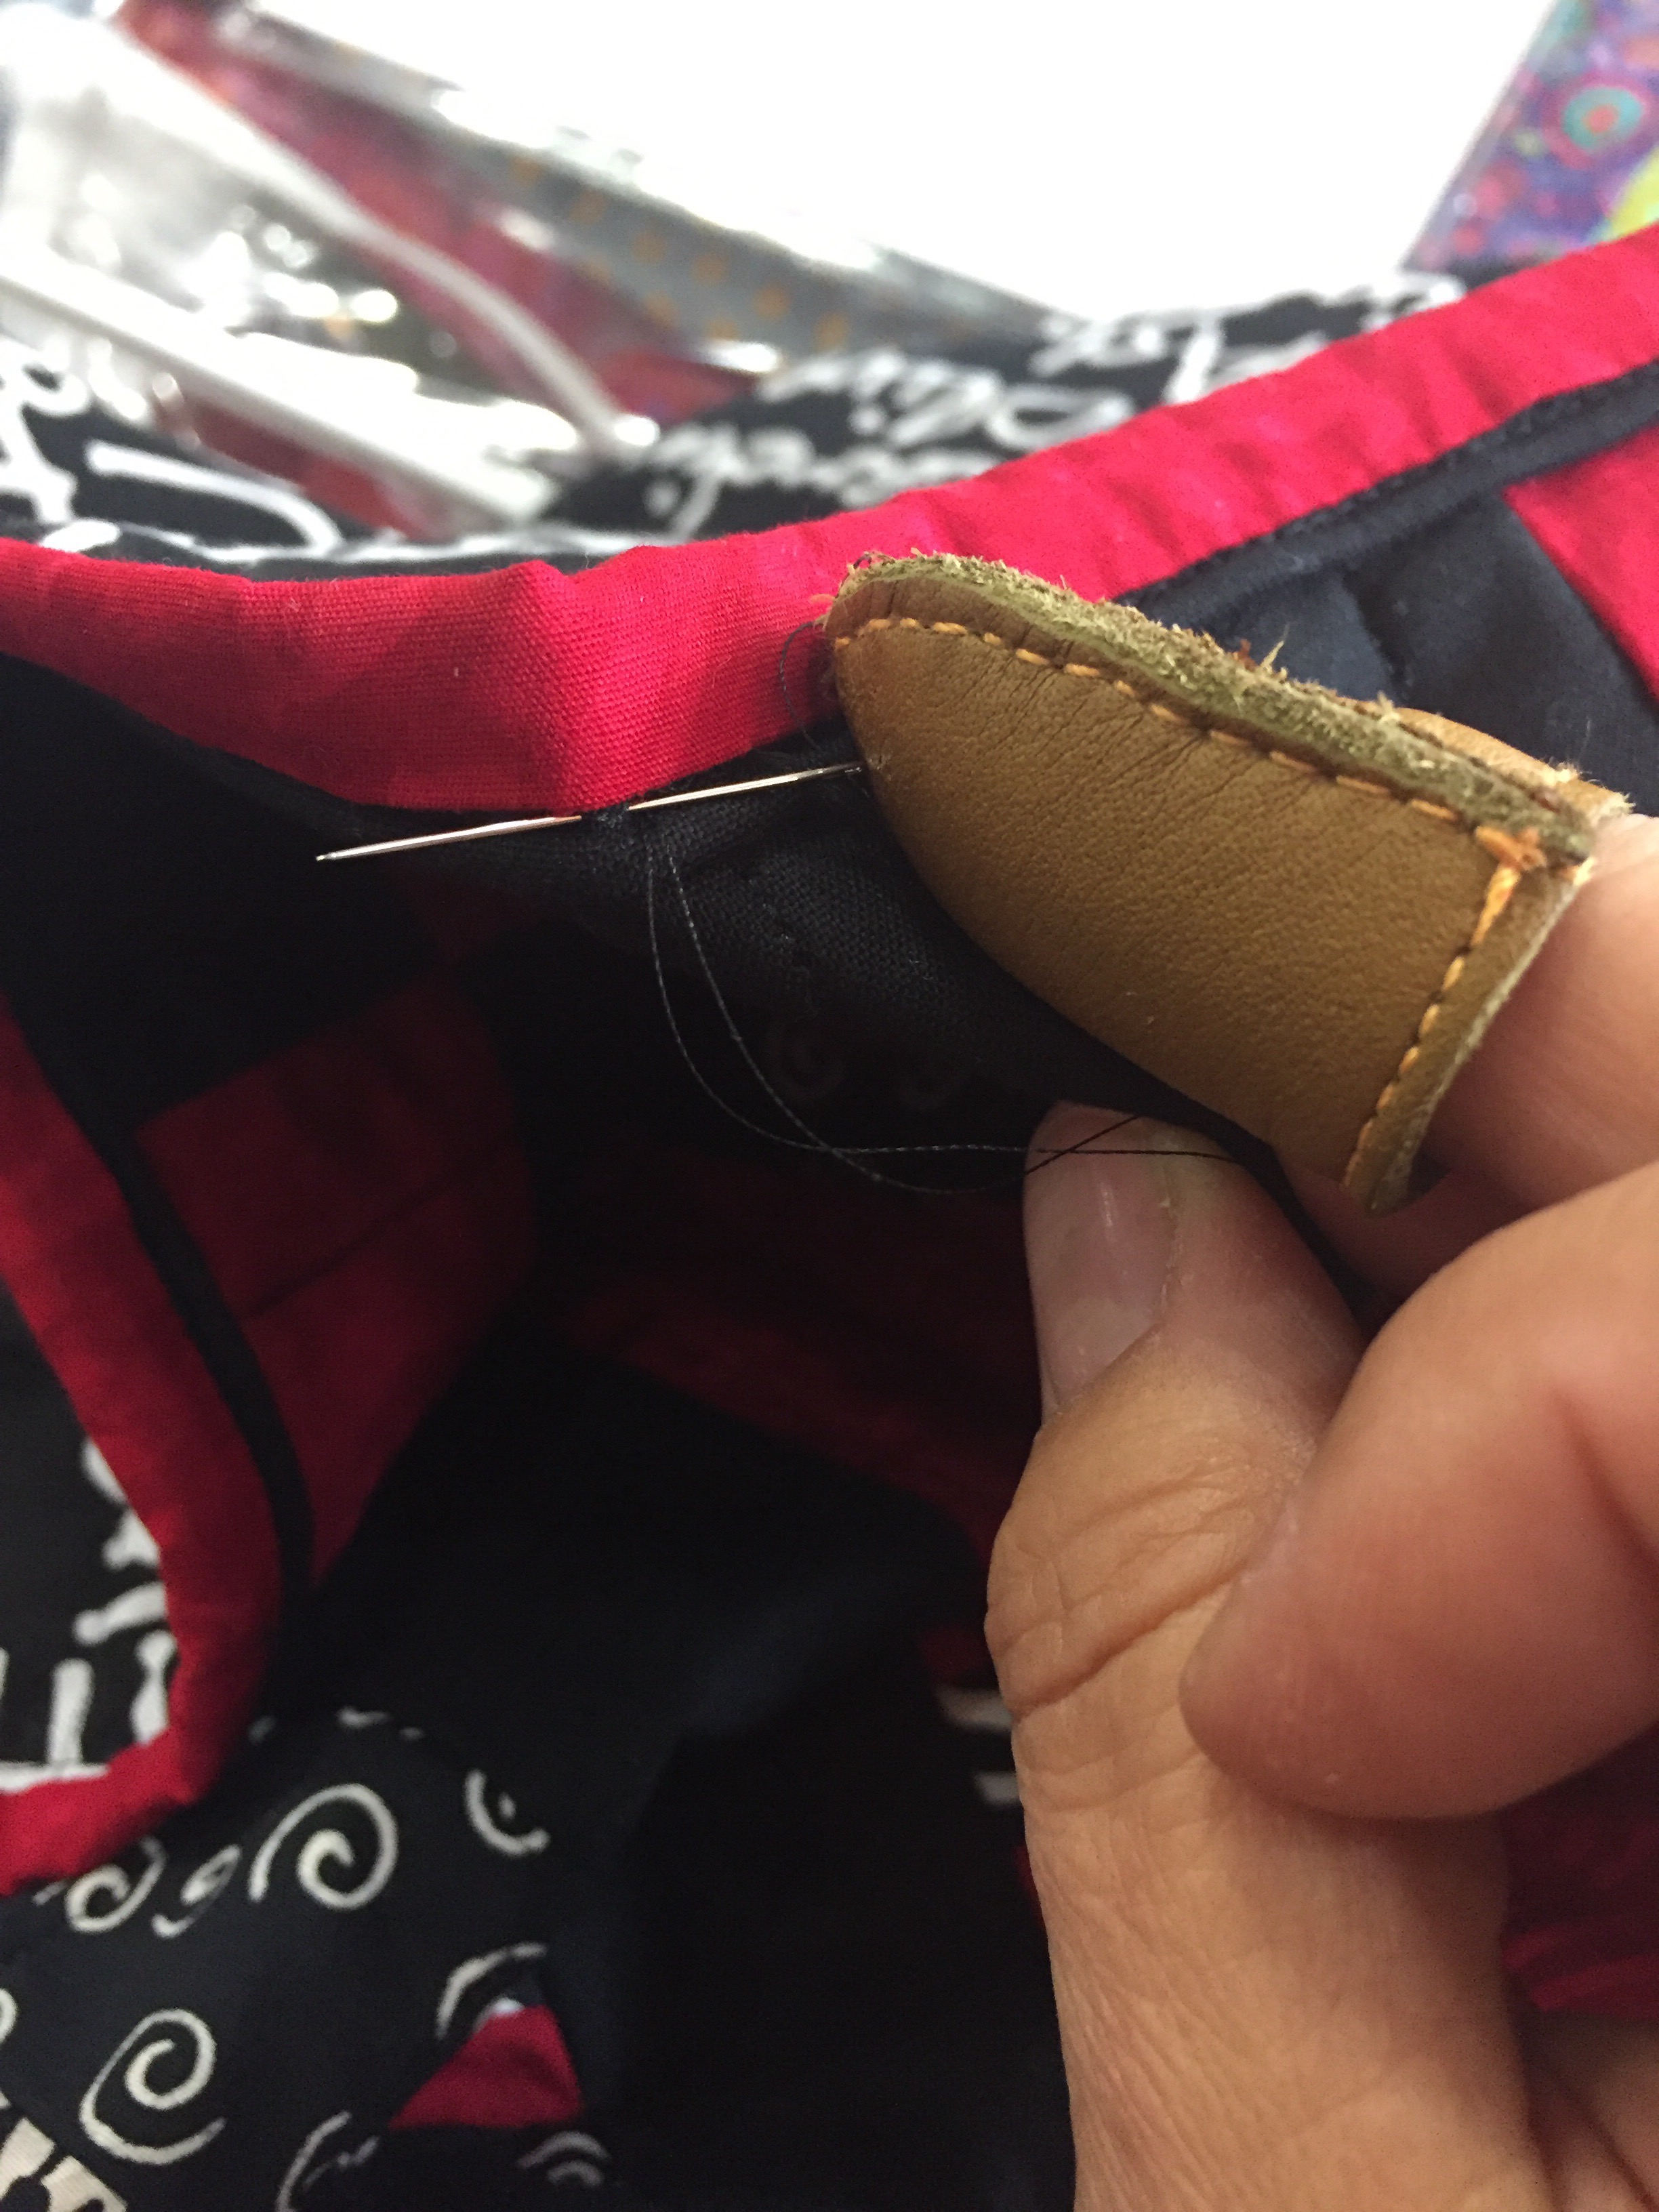
Yes you can quilt straight lines on a 45 degree angle
I didn’t want the tedium of sewing straight lines over and over on this little faux chenille quilt. So I cut some muslin triangles, basted them on and plopped that little quilt right on my long arm.

Tshirts Quilts
Boy, do they use a LOT of needles!
I suppose it is all the laundery detergent left in the fibers and the thick ink from screen-printing that is on them.
When to use a thread net
I use a thread net on the spool of thread when I see the thread coming off the spool in jerks or big spasms. I always use one on monopoly and metallic thread spools.
Two things happen when a thread net is used.
1. A teeny bit of top tension is added. So I may have to back off the top tension a smidge. On my Innova ling arm that is about a quarter turn of the top tension knob.
2. The thread comes off the spool more smoothly so the thread does not drape and get caught on a screw, get wrapped under the spool, come out of a hook or eye, or get caught on a fitting.
Kelly’s Chicken Pumpkin Chili
I love fall. I love cold crispy weather. And, I love pumpkin. But I’m not too crazy about sweet pumpkin dishes or even about sweet “sweet” potato dishes either. So I decided to make a savory pumpkin recipe. A couple of nights ago, my family pitched in together to make chili on a cold frosty Nebraska night. Tonight it is a cold chilly Texas night and chili seemed to be on order too. But we had no beef… What to do? Invent! Hubby had two servings (unusual for him) and said, “you have to remember how to make this, it’s good.” So, here it is.
Ingredients
- 1 tablespoon extra virgin olive oil
- 2 good-sized leeks including the green tops (leeks are not scallions, and are not green onions) or 1 medium onion, finely chopped
- 2 stalks celery, diced including the leaves
- 2 carrots, diced (or 1 snack pack )
- 3 cloves garlic, pressed or minced
- 1 (32 oz.) carton reduced sodium chicken broth
- 1 (15 oz.) can pumpkin purée (NOT pumpkin pie filling, needs to be 100% pure pumpkin without any flavorings)
- 1 (15 oz.) can black beans
- ½ cup frozen or sm can of corn kernels (mexicorn works great too)
- 1 cup nonfat plain Greek yogurt (I used 2% Fage Greek Yogurt)
- 2 teaspoons – 2 tablespoon ground cumin* (I LOVE comino and use a lot)
- 1 tablespoon pinto bean seasoning (Fiesta)
- 1-2 tbsp chili powder (Gebhardt’s)
- 1 teaspoon sea salt
- ½ teaspoon freshly ground black pepper
- 2 tablespoon Cider Vinegar
- 3 cups cooked shredded chicken breast
- 1 teaspoon or more of red cayenne pepper (start with less and add to taste)
Optional garnish finely chopped fresh cilantro, greek yogurt, diced avocado, shredded cheddar cheese and tortilla chips
Instructions
Heat olive oil in deep soup pan, add leeks, celery , garlic. Sweat out the leeks and celery until they are just starting to caramelize, then add the carrots. Sauté till carrots are tender, add the black beans, corn, pumpkin, mix up. Add the spices, and cider vinegar mix up. Add some broth until it is like runny pudding in consistency ( it will not use all the broth). Add the yogurt. Now add the corn and chicken. heat and stir. If it gets to thick, add more broth. Keep stirring every once in a while until the chicken is hot. Add more broth if you need to. You will probably not use all the broth.
Notes
I prefer to make this very thick so it is like a chili. You can easily turn it into a tortilla type soup and stretch the recipe for more people if you add more broth. if you do that, you will need to adjust the seasoning by probably adding more.
My family loves comino and chili and spicy foods, so after the flavor was good, I added MORE. Use the smaller amounts first, until you know what your personal taste is like. And, you can tone down the spiciness by adding more yogurt if you need to.
I served the Chicken Pumpkin Chili with a dob of greek yogurt, grated cheese, and sprinkling of chopped cilantro.
*I ground my own comino seed in a small mortar and pestle. I also used leeks. I find leeks sweeter and smoother tasting than regular onions, and prefer to use them whenever I can find them.
Mom Made a Quilt for Me
Mom loves traditional block patterns, especially log cabin blocks. I am not and never have been a traditionalist at anything. So we decided to quilt but quilt different things. Mom has gotten into the quilts of valor big time and has also made a quilt for almost everyone in family. The quilt she made for me is purples, lavenders and pinks. And it IS on a bed! In fact, I decided to decorate a whole guest room around it. It’s going to be an 1880’s bordello fluffy vision of linen and lace and crystal chandeliers (while the rest of my house is distinctly southwest eclectic tomboy.) I hope it gives Mom and Dad a thrill to spend the night in it. Maybe it will kindle romance. (cover my eyes, can’t imagine the parents romancing).
The Day Mom Tried to Steal My Quilt (aka the day we started quilting).
I have to start this story with some background first:
My mom made a lot of my clothes when I was a toddler and she made some fantastic formal dresses and things for herself. So awesome in fact, that when she was throwing one out, I kept it. It is in my closet today. She and I have never been the same size or shape. I am taller and had less bust. She is finer boned. But that dress in a beautiful 70’s avocado green is runway quality. I couldn’t just let her throw it away. I remember her wearing that with her hair teased up and sparkly earrings and jewelry looking like a movie queen when Dad took her to a big formal Dining Out Military Ball. She was beautiful. So the dress is mine! HA! Mom loved sewing and she did it really well.
I took home-ec in high school because I loved to cook. What I didn’t think about was that home-ec had a half semester of sewing which, being a tomboy, I didn’t have much time for. The result I created was the most horrendous rendition of a hippy shirt that even the most down and out hippy wouldn’t have worn it. We had to wear our creations to school and mine fell apart. My best friend, Nicole, saved me from total nudity by grabbing the shoulder seam and keeping it from falling on the floor. I do think I flashed my size AAA bra at some senior cutie though. I was sooooo embarrassed. That was pretty much my sewing experience until I was in my 40’s.
My mom was looking in my linen cupboard and fondling the quilt my great-grandmother had made for me. It was the last quilt Grannie ever made. Completely hand sewn from piecing to quilting with her very arthritic fingers. Of course I didn’t appreciate it as a fourth grader. I was into ‘pink’, pink carpet, pink walls, pink sheets, pink teddy bears. But I didn’t wear pink and I hated dolls. Also, I was a confirmed complete tomboy who liked helping my dad work on his cars. I was a tomboy who just happened to like pink to look at. Anyway Grannie’s quilt was green, as green as green could be, and covered in the most carefully stitched Sunbonnet Sue appliquéd dolls. So I wasn’t exactly jumping up and down when I got it in fourth grade. Mom told me I had to use it since Grannie worked so hard on it. I put it on my bed UNDER the pink coverlet.
Roll forward 40 plus years, to the day I caught my Mom trying to steal my quilt from Grannie. Mom told me she was taking it home since I didn’t appreciate it. HUH!?! What are you talking about!?! I said. She informed me.. I had it in the closet; and, not on a bed; and, since it was made with love; and, that I didn’t appreciate it because it wasn’t out on a bed. I kinda got mad.. okay, I got really mad.. what Mom didn’t know or remember was.. that quilt saw me through pneumonia in the hospital, that quilt went on all our US crazy nation crossing camping trips, that quilt went with me all over the United States of America after I grew up and left home, that quilt was the one I chose to curl up in watching late night movies (and still do), that quilt covered me and my dog when I was crying to myself over cancer trials and tribulations, that quilt was the first thing I took and packed when leaving my exes… all of them… all the boyfriends and jerks and all. That quilt lived my life with me and was the only thing I had from a great-grandmother I heard great stories about but never got to really know because my family lived all over the world, away from the relatives. That quilt was part of my life and gifted to me. Not to her. That quilt didn’t mean as much to her and it did to me. No way it possibly could. I lived some very emotional parts of my life and left gallons of tears on that quilt. But Mom didn’t know all that. All Mom knew was that I didn’t like it as a fourth grader and I hid it under the pink coverlet to hide it.
But I did realize something. She had her own story about Grannie. And that got Mom and I talking. We talked about other relatives and how she didn’t have very much in the way of material things to remind her of Grannie.
Mom is getting older and her children have not reproduced. I think sometimes that really gets to her. What legacy is left, what will be left behind? She wants to leave something that people will appreciate, care about and remember her by. She has done and incredible job and is still finding facts about our family history. It is fascinating. But what about the future. We talked around that subject, but I think that the future is what really was bothering her that day.
We talked about what Grannie’s quilt meant for each of us. Mom mentioned she always wanted to quilt. I asked her why she didn’t. Mom often just doesn’t do a thing because she thinks they will be too hard to do or she will be unsuccessful. I doubted Mom could make a bad quilt if she tried because I have seen her sewing skills and have the dress for proof. I told her that and I suggested that the only thing that can happen is that we make an awful quilt and we would really hide in our closet. not cause we are adults and don’t want a twin size sun bonnet sue on our king size bed.. but because we really should hide it. And we would see it and laugh, and it would be a legacy of her.
So, that was the day, Mom and I made a pact to start quilting.
Machine Experiments with 12 Weight Thread : Part 1
Adding to this post over time will allow me to keep track of what I try with this very thick thread. I resort to hand stitching when that is the ONLY way to get the effect I want. Superior Threads has a new thread that looks delicious for both hand sewing and also mentioned that their Sew Sassy 12 wt/3-ply Polyester thread can be run through a machine. This thread is kinda fuzzy and thick and looks like cotton, but doesn’t break like cotton. I know that you can put just about anything in a bobbin. But Superior mentioned running it through a needle!?! Really? I have to try this.
Experiment 1: Using 12 wt Sew Sassy on the Innova Longarm
Working on a improvisational modern quilt, I wanted to try out comic book drawing theory. The basic idea is that thin lighter lines that more closely match the background recede into the distance while heavier bolder thicker lines come forward into the foreground. I quilted the background with 60 wt Bottom Line thread. I also quilted some of the shapes that should appear towards the back of the arrangement with 50 wt and 40 weight threads. One shape should appear to be floating out on top in the front and I though I would try Sew Sassy 12 wt. Also to echo the plan on the back of the quilt, I decided to use the Sew Sassy in the bobbin also. I figured that it would be easier to balance the tension if the same thread were in the top and bottom of the machine.
Need a Big Needle
Superior recommends a size 21 needle. , a very THICK needle. Necessary as this thread is very thick.
I had to “loosen” the bobbin tension screw as the thread is thicker and effectively caused a tight tension. I use the TOWA gauge and got it to about 180. That is what I aim for no matter the size of the thread.
Timing adjustments may be necessary
Test sewing showed very odd results. The stitching shows that this super thick needle is actually deflecting during stitching. This needle is so thick it should not be deflecting at all. I slowly turned the machine by hand through one stitch cycle. I believe I will have to re-time the machine with the thick needle in place.
I will try this out after I get this particular quilt off the frame.
Fabric Type Matters
Also the thickness of the needle is causing some problems with the cotton quilt backing fabric. It is spreading the weave apart so much that it looks like the fabric might easily tear at this stitching line. I do think with a very loose weave fabric such as wool, felt or even burlap (art quilt anyone?) that it will be very possible to use Sew Sassy in the needle on my long arm.
Possible Next Tests with 12 wt Sew Sassy:
Try using a fabric with thicker fibers and looser weave.
Reset Bobbin distance and timing so I can use a 21 needle on my longarm.
Make sure to adjust tension both in the bobbin and top tension assembly.
A Blunt Question to Ponder
Melanie of Catbird Quilt Studio wrote a post that made me think profoundly about what happens to all our quilt stuff and stash when we die:
 Last month a family member died. He had no will, and aspects of his assets have created a mess for his widow. Jim and I have long had wills and recently reviewed them with our attorney. But I still…
Source: A Blunt Question to Ponder
Fabulous Flat Quilt Hanging Hardware
Using inexpensive metal straps and plates from the hardware store with neodymium magnets makes a quilt safe hanging method.

Deciding to change the art quilt on my wall pretty often, I realized that a traditional nail wasn’t going to cut it. My quilts have variable sizes and weights. I got the idea for this setup from my magnetic name badge. Surfing my favorite magnet website, I found that there are magnets strong enough to even hang a regular quilt.

Neodymium magnets are very strong, and have a polished clean finish. Magnets strong enough to hang a bed quilt should be used with caution. Their strength could damage your fingers if your fingers or skin got slammed in between them.
For my test, I am hanging a 24×24 art quilt. I wanted temporary but strong and reliable setup so chose 3M command strips of the strongest I could find. My local home depot had 16 lb velcro sets for hanging framed pictures.

I used 1 13/16 in x 5 in tie plates (found in the lumber department in the structural straps section), and I also bought a variety of 20 guage strap ties in various lengths. 18 Guage would work too. But keep mind that there is a tradeoff in how strong a magnet sticks (thicker metal or more iron in the metal) versus weight of the metal. These bars will not sag because they will be oriented flat to the wall.

I overlapped two flat metal bars so they were long enough to fill the entire quilt sleeve but not stick out beyond the quilt. I put the command strips on the small tie plates. This size, five inches long, give enough surface room for the long command strips. The tie plates are then fixed to the wall and I allowed them to adhere for an hour to allow the command strip adhesive to develop full strength. I checked the width of the quilt back and made sure the tie plates were hidden behind the quilt. Put a magnet on the top of the tie plate.


I slid my assembled strap into the quilt sleeve and set it against the magnets. it was super easy to adjust the level. And it will be super easy to add length and tie plates with magnets.
The result is a super flat against the wall hanging arrangement that fully supports the quilt without pinching, compressing, or putting holes (pins or tacks) in your quilt.
I believe this is my hanging method of choice from now on!

