
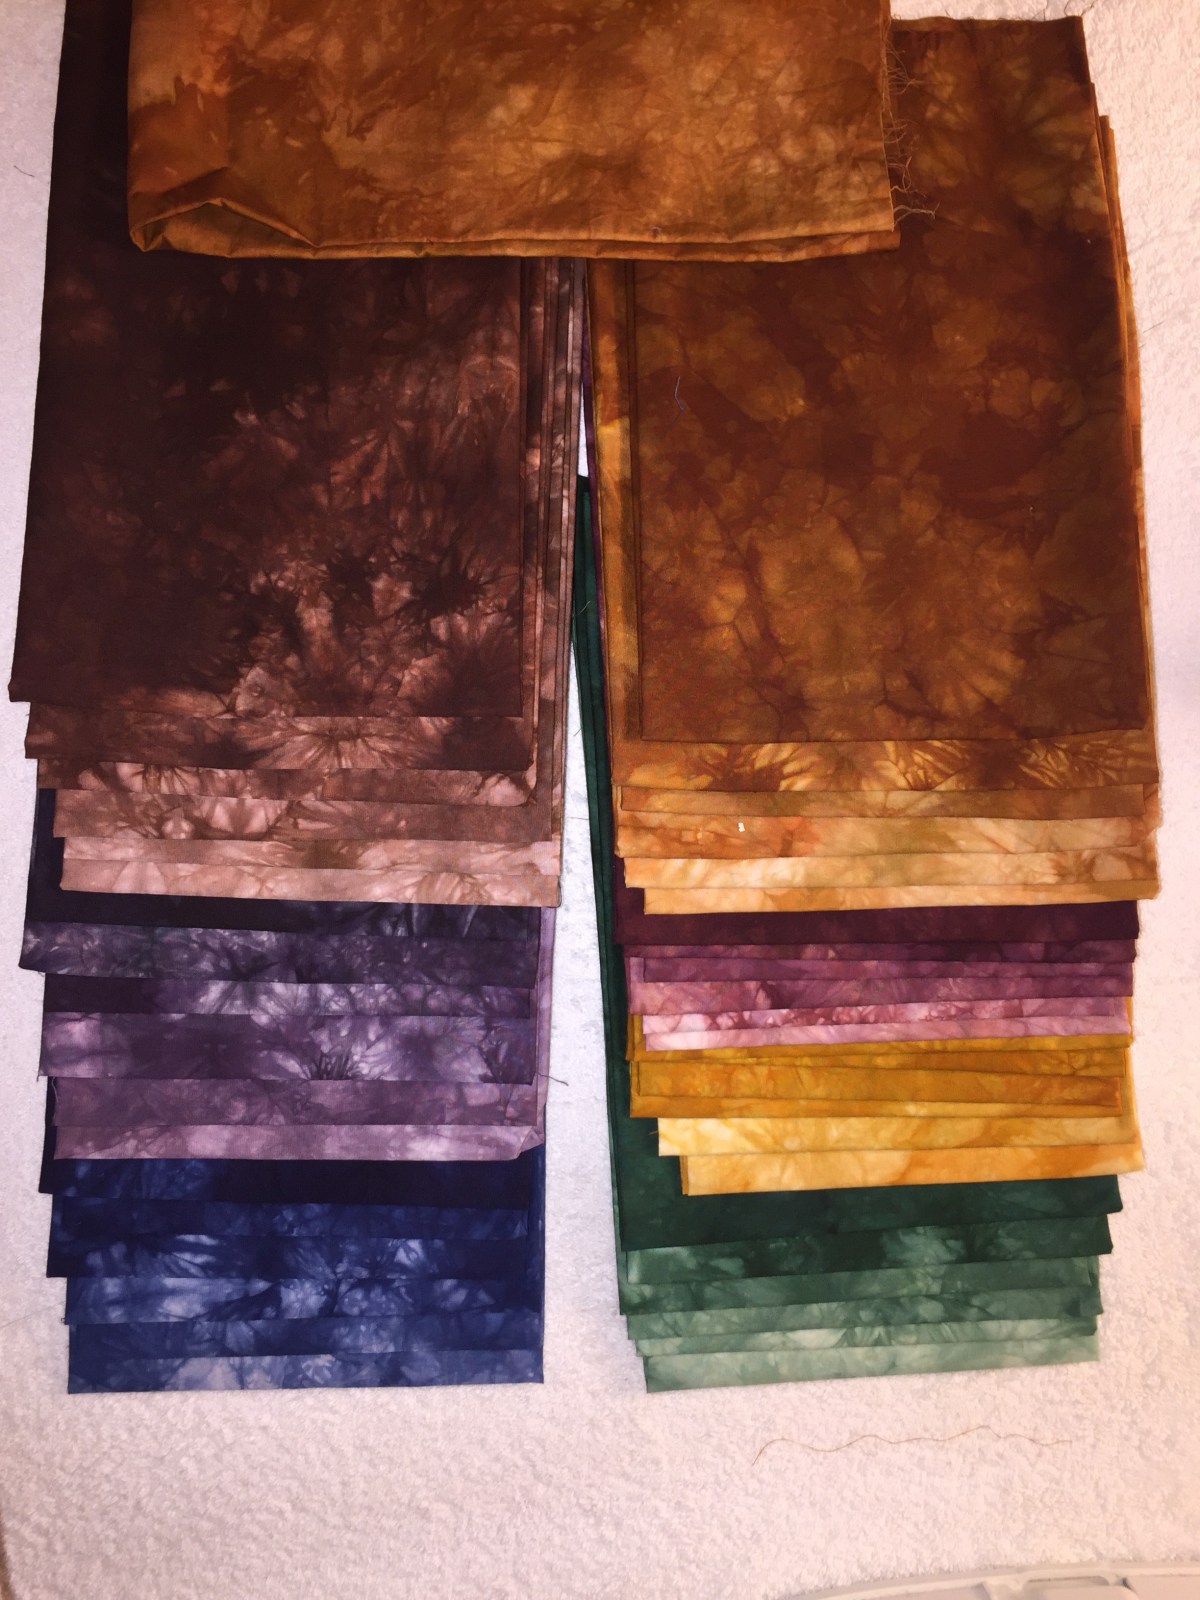
I took a gradations dying class from Cindy Lohbeck. Her class was all about creating color value. I have been learning a lot this past year about value which is basically lightness or darkness of colors. In Cindy’s class we used dilutions just like I did in chemistry class back in college. We made six values from light to dark of seven different colors. It was awesome to make 42 fat quarters of these rich colors. It is something that I am going to keep in mind when I dye in the future.
Tag: technique
My new use for an old spool tool

I was getting frustrated with trying to control a very long binding I was putting on a king size quilt. I tried throwing it over my shoulder. I tried putting it on a paper towel cardboard tube. I tried draping it over my sewing machine. Finally, I tried my trusty cone holder! Success!

Finally found a thimble I love

Finally found a Thimble that I love at Holly Dee Quilts in Luling, Texas. It is a leather thimble with two layers of leather on the finger tip and fits me like a glove tip made for me. 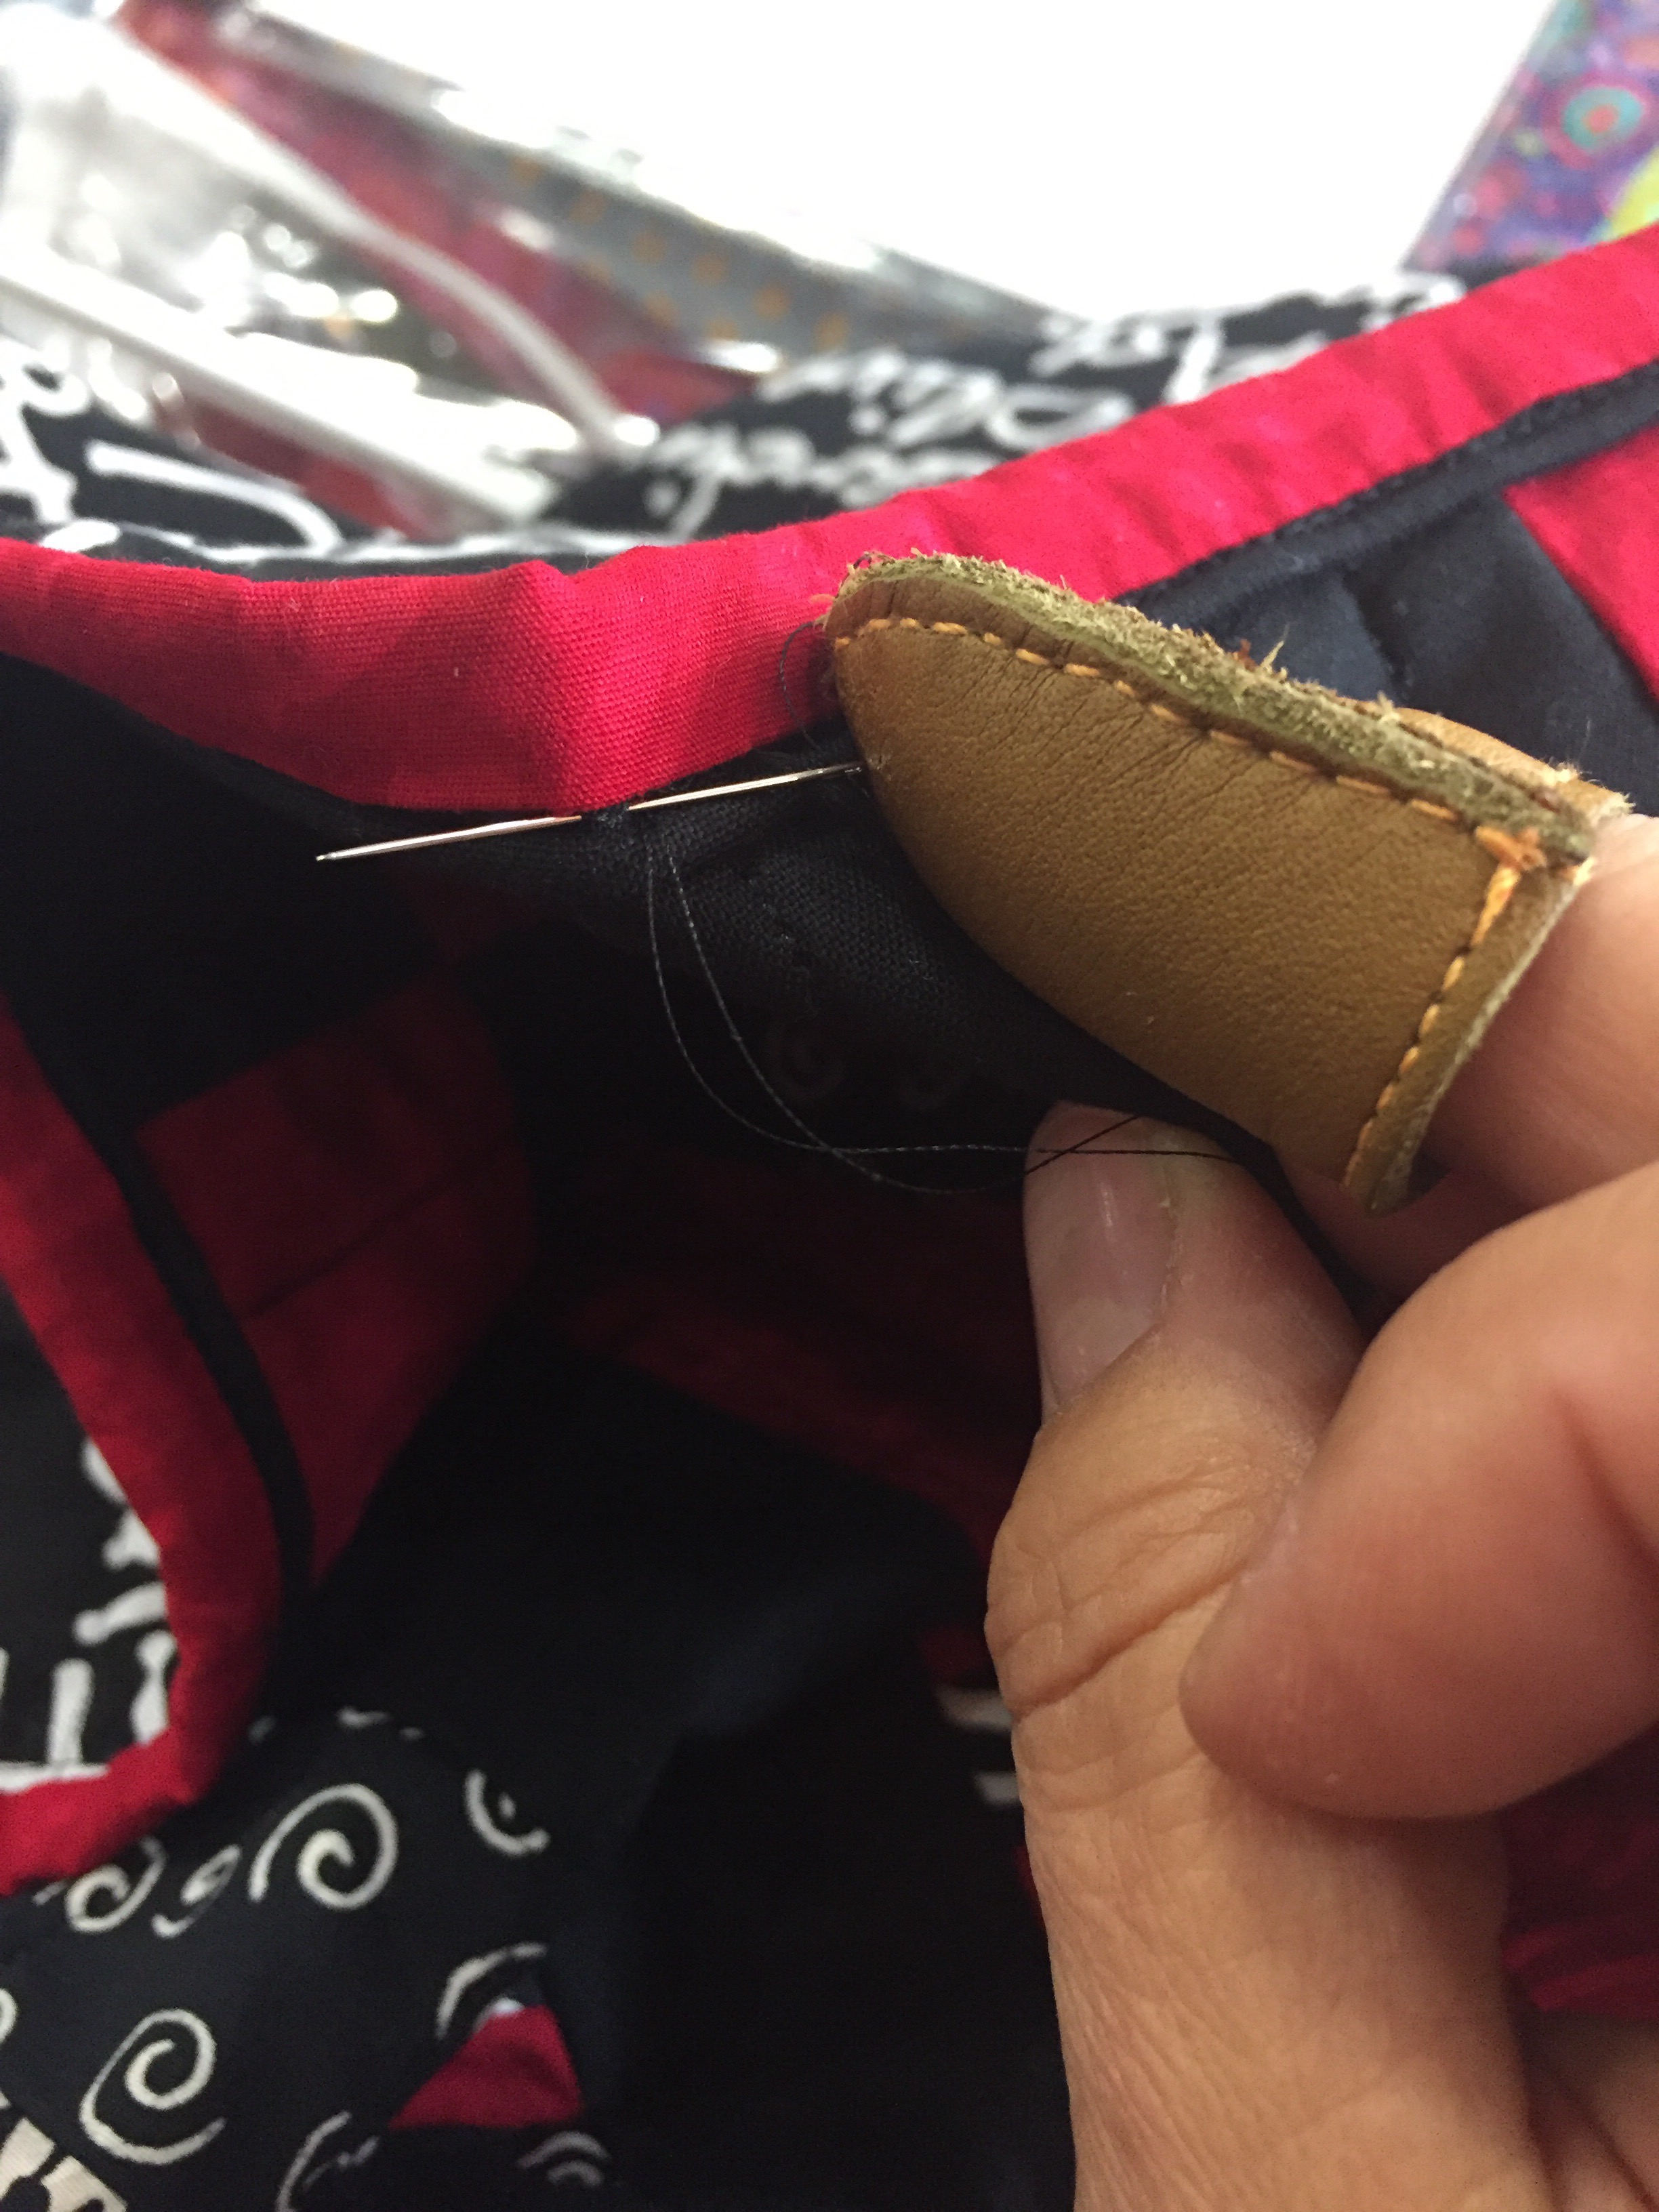
Machine Experiments with 12 Weight Thread : Part 1
Adding to this post over time will allow me to keep track of what I try with this very thick thread. I resort to hand stitching when that is the ONLY way to get the effect I want. Superior Threads has a new thread that looks delicious for both hand sewing and also mentioned that their Sew Sassy 12 wt/3-ply Polyester thread can be run through a machine. This thread is kinda fuzzy and thick and looks like cotton, but doesn’t break like cotton. I know that you can put just about anything in a bobbin. But Superior mentioned running it through a needle!?! Really? I have to try this.
Experiment 1: Using 12 wt Sew Sassy on the Innova Longarm
Working on a improvisational modern quilt, I wanted to try out comic book drawing theory. The basic idea is that thin lighter lines that more closely match the background recede into the distance while heavier bolder thicker lines come forward into the foreground. I quilted the background with 60 wt Bottom Line thread. I also quilted some of the shapes that should appear towards the back of the arrangement with 50 wt and 40 weight threads. One shape should appear to be floating out on top in the front and I though I would try Sew Sassy 12 wt. Also to echo the plan on the back of the quilt, I decided to use the Sew Sassy in the bobbin also. I figured that it would be easier to balance the tension if the same thread were in the top and bottom of the machine.
Need a Big Needle
Superior recommends a size 21 needle. , a very THICK needle. Necessary as this thread is very thick.
I had to “loosen” the bobbin tension screw as the thread is thicker and effectively caused a tight tension. I use the TOWA gauge and got it to about 180. That is what I aim for no matter the size of the thread.
Timing adjustments may be necessary
Test sewing showed very odd results. The stitching shows that this super thick needle is actually deflecting during stitching. This needle is so thick it should not be deflecting at all. I slowly turned the machine by hand through one stitch cycle. I believe I will have to re-time the machine with the thick needle in place.
I will try this out after I get this particular quilt off the frame.
Fabric Type Matters
Also the thickness of the needle is causing some problems with the cotton quilt backing fabric. It is spreading the weave apart so much that it looks like the fabric might easily tear at this stitching line. I do think with a very loose weave fabric such as wool, felt or even burlap (art quilt anyone?) that it will be very possible to use Sew Sassy in the needle on my long arm.
Possible Next Tests with 12 wt Sew Sassy:
Try using a fabric with thicker fibers and looser weave.
Reset Bobbin distance and timing so I can use a 21 needle on my longarm.
Make sure to adjust tension both in the bobbin and top tension assembly.
Fabulous Flat Quilt Hanging Hardware
Using inexpensive metal straps and plates from the hardware store with neodymium magnets makes a quilt safe hanging method.

Deciding to change the art quilt on my wall pretty often, I realized that a traditional nail wasn’t going to cut it. My quilts have variable sizes and weights. I got the idea for this setup from my magnetic name badge. Surfing my favorite magnet website, I found that there are magnets strong enough to even hang a regular quilt.

Neodymium magnets are very strong, and have a polished clean finish. Magnets strong enough to hang a bed quilt should be used with caution. Their strength could damage your fingers if your fingers or skin got slammed in between them.
For my test, I am hanging a 24×24 art quilt. I wanted temporary but strong and reliable setup so chose 3M command strips of the strongest I could find. My local home depot had 16 lb velcro sets for hanging framed pictures.

I used 1 13/16 in x 5 in tie plates (found in the lumber department in the structural straps section), and I also bought a variety of 20 guage strap ties in various lengths. 18 Guage would work too. But keep mind that there is a tradeoff in how strong a magnet sticks (thicker metal or more iron in the metal) versus weight of the metal. These bars will not sag because they will be oriented flat to the wall.

I overlapped two flat metal bars so they were long enough to fill the entire quilt sleeve but not stick out beyond the quilt. I put the command strips on the small tie plates. This size, five inches long, give enough surface room for the long command strips. The tie plates are then fixed to the wall and I allowed them to adhere for an hour to allow the command strip adhesive to develop full strength. I checked the width of the quilt back and made sure the tie plates were hidden behind the quilt. Put a magnet on the top of the tie plate.


I slid my assembled strap into the quilt sleeve and set it against the magnets. it was super easy to adjust the level. And it will be super easy to add length and tie plates with magnets.
The result is a super flat against the wall hanging arrangement that fully supports the quilt without pinching, compressing, or putting holes (pins or tacks) in your quilt.
I believe this is my hanging method of choice from now on!

Thread Weights Look Like What?
Lots of science boils down to this:
Higher wt number on thread means it is skinnier and will kind of hide so the fabric is more emphasized. The lumps and bumps are more emohasized.
Lower wt thread is thicker thread so the thread shows more.
Choose your thread weight by the effect you want to get out of your quilting.
Of course, if you want to break the rule of thumb, then pile on and paint with the skinny thread to show up more like Libby Lehman does it.
And think about this, if your freemotion or longarm pattern requires a lot of traveling over previous stitches, a thinner thread won’t pile up as much as a thick one.
On Long Arm Quilting with Monofilament
For Superior Threads Monopoly in the top and Bottom Line (or any thread in the bobbin) in the bobbin. I use the TOWA tension gauge to set my bobbin case to a value of 180. I loosen my top tension knob about 2.5 turns.

This week on my facebook longarm quilt group, a member asked about using monofilament. I mentioned monofilament in a blog post https://wordpress.com/post/freeformquilts.com/626 a while back. Now that I have experimented more with monofilament I need to save my observations here.
I want a monofilament that sews like regular thread but “disappears” into the background fabric so that the quilting and fabric are emphasized instead of the thread lines. After many combinations and brands of monofilament, I finally came up with a repeatable easy solution that works every single time for me. I use Superior Threads Monopoly in the top and Superior Threads So Fine in my bobbin.
Thread Chemistry affects stitching
I tested several clear monofilament threads. Mono filament thread is a single continuous strand of fiber of polyester. Polyester seems to be stronger than other monofilament thread types.
Nylon monofilament threads stretched more and I didn’t like using them, even when I had all the tension loosened way up, they still stretched. I didn’t like how it formed stitches and I liked even less how much they could pull fabric up and warp it.
Quality of thread manufacturing also affects the stitch out. A single strand that is made to exacting thickness will give a consistent result. In a multi fiber thread, slight variations of thread thickness are compensated by the multiple fibers. In a mono filament, a thinner section of thread can cause breakage and malformed stitches.
Once I got my machine setup to form beautiful stitches Superior’s Monopoly did not break. Monopoly also comes in both a clear and a smoke color. Monopoly is matte finishe and so you don’t see a “sparkle” when looking at the quilt from an angle. The smoke is also clear but smokey looking which is great on darker fabrics as light reflectance is minimal and this thread really disappears on dark backgrounds. Due to its matte finish and strength and consistent stitching, I greatly prefer Superior Threads Monopoly.
What is monofilament?
Keep in mind any mono (one strand) filament thread is going to be weaker than a two strand or three strand thread, to compensate that one strand is going to be a little thicker than the single strand of a multi-strand thread. It’s worth mentioning because you might observer that the thread is a little thinner than what you would normal consider for a specific needle size. In face Superior is only .1 mm thick! Needle choice will have a BIG impact on stitching with monofilament. Try first what the manufacturer of that thread suggests. It really does matter.
Needle Size
Superior recommends a #14 needle. I generally use a #14 needle but may go up to a #18 needle in certain cases. If it seems the needle flexing is causing the monopoly to break, go up to a bigger needle size. This is more of an issue when freemotion quilting with monopoly. A thicker/bigger needle is stronger and going to flex less.
Threading path changes
If I am having the monopoly break, I check my threading path. I thread through the only one hole in the top guide post instead of the normal winding around through both holes on the top guide.
Tension really matters
The key to beautiful stitches with Monopoly is your thread tension balance between the top and the bottom. You will need to loosen your top tension. On my Innova two to three full turns to loosen the top tension knob are required. Exactly how much depends on the thread I choose for the bobbin.
Bobbin Thread Affects Stitching with Monofilament
I have found that using monofilament in the top and bobbin really doesn’t work. Monofilament, because it is only one strand of fiber, is very slippery. The monofilament will not “grab” onto another monofilament thread and so the stitch doesn’t form and hold. Sometimes the stitches even skip completely. To get a good stitch formation, I have found that using a multi filament thread in the bobbin is a must. The multi-filament thread will grab the monofilament and form a better stitch.
I choose my bobbin thread based up on the effect I want to see on the back of the quilt. If I want the bobbin thread to have a disappearing effect, I will choose a bobbin thread such as #60 bottom line by Superior and very closely match the color to the quilt backing. Bonus to this combo is that Bottom Line is very thin and a LOT of yardage fits on a bobbin. Less bobbin changes is a very good thing in my mind. I often use #50 weight of many types such as cotton or trilobal polyester. I rarely go to a thicker thread, but have successfully used #40 weight polyester thread too.
Bobbin Case and Tension
The key to the bobbin thread no matter the thickness, is to have consistent tension.I keep repeating this because it is just that important. I have a TOWA bobbin gauge and that has made all the difference in my long arm quilting. GET ONE!
Summary of What I Do to Set Up for Monopoly
For Superior Threads Monopoly in the top and Bottom Line (or any thread in the bobbin) in the bobbin. I use the TOWA tension gauge to set my bobbin case to a value of 180. I loosen my top tension knob about 2.5 turns. Then I test on the edge of the quilt sandwich set and adjust only my top tension knob either looser or tighter to get a perfect stitch. I also test after each bobbin change or whenever I feel the stitch isn’t right.
Problem Solving Tips
- Pokies on the top = loosen top tension and/or check bobbin tension with gauge
- Pokies on the bottom = tighten top tension and/or check bobbin tension with gauge
- Shredding thread.. quilt fabric and batting tension might be too tight. Bop it and see how it bounces. I have a habit of making this too taut.
- Refer to my troubleshooting notes.
I have demoted two of my free motion quilting tools.

Seriously, I found something last month, used it today and immediately bumped it to the top of my favorites list. The quilt halo. It is a hefty iron ring coating in a slightly tacky plastic. It really keeps the fabric from bunching up right under the needle. Keeps the fabric flat and at just the right tautness or flatness which helps with tension issues. I don’t have to wear those uncomfortable gloves any more. It makes me happy! Oh, it also seems to lessen the need for a free motion slider.. but with both in place.. it’s like quilting on an ice rink. Seriously, I like this tool. If I had to choose between the slider and the halo. I’d pick the halo. Before you ask, NO! I’m not getting paid to endorse. I just like this tool a lot. If you local quilt store doesn’t have it, you can buy it from the source.
http://purpledaisiesquilting.com/collections/top-10-products/products/quilt-halo-free-motion-quilting-tool
Superior Threads Reference Guides
Ricky Tims and Alex Anderson posted a list on TheQuiltShow website about their favorite Superior Threads reference pages. They just happened to post my go-to pages! How about that?! Here is the link on The Quilt Show of that very helpful list.
Superior Threads Reference Guides.
PSST. The $42 bucks I spent on the full access star membership for thequiltshow.com is the best return on investment I’ve gotten on quilting education. And they didn’t pay me to say that. There is such a wide variety of topics and guests on the show, it’s amazing. I’ve had a lot of ah-ha moments watching the episodes.
