What to do with an old stool?

My Grammy’s wooden stool holds a lot of memories for me. I remember sitting inside the legs pretending it was a house, a fort, a jail, a treehouse and a dozen other wonderful hideouts. Grammy would pretend she couldn’t see me when I was under that wonderful old stool. I’m sure it was a great play toy for my cousins too. I remember the day I could no longer fit inside the legs of the stool. Grammy laughed and laughed until I started laughing too. We both had tears streaming from our eyes. Those were great times.

That stool moved with Grammy from home to home until she moved in with my parents. She gave me many of her things as I was a young adult and starting out on my own. The stool was one of them. And through my own moves and life changes I have kept that old stool. I’ve used it in all my kitchens just like Grammy did. At 50 plus years old, the stool finally started having issues with staying together. The hard oak wood is still sound, but the joints, just like my own, are a little loose and the legs and cross pieces would come out of their joints. Glueing helped temporarily but within months the joints would come apart again. I want to continue to use the stool. What to do?

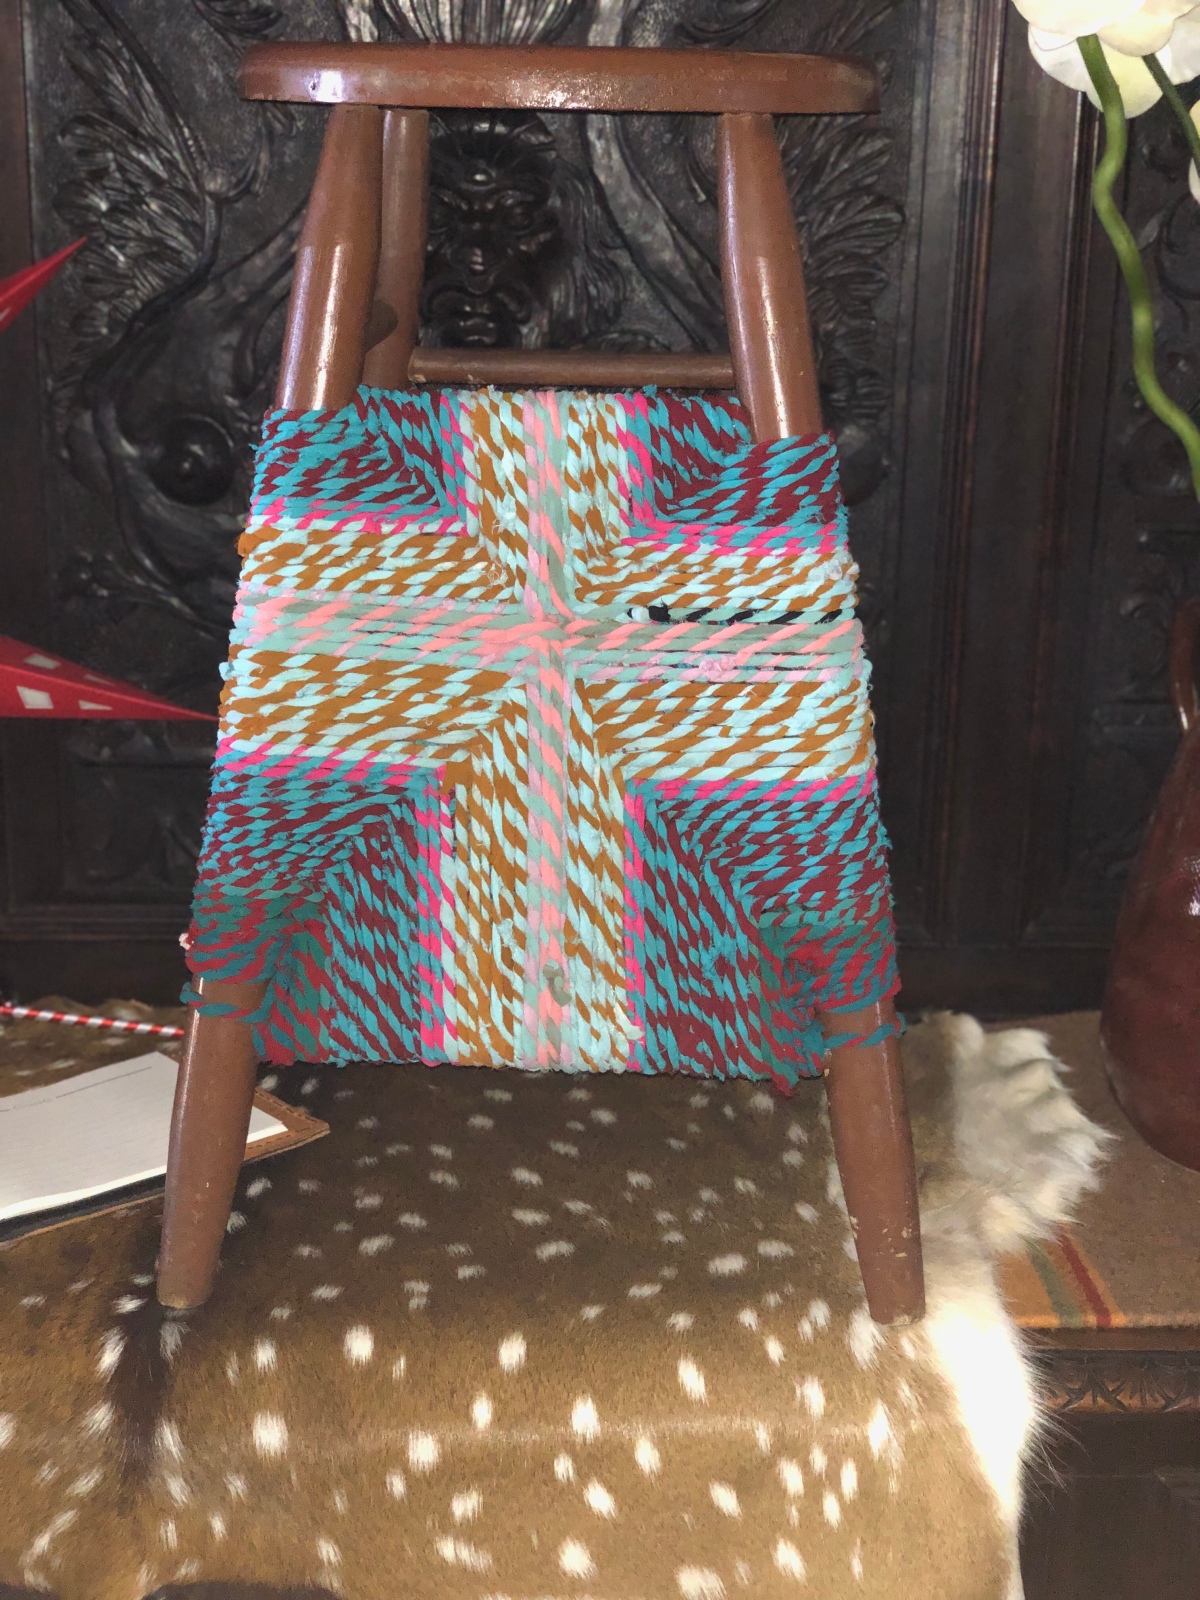
I took string and wound it around the base of the legs to keep pressure towards the center and the stool stayed together. So, like me, that old stool just needed a little help. The string wasn’t very pretty.

I was shopping at the Antiques Week in Texas and north of Roundtop I found a place selling upcycled useful things. I bought some giant balls. Long strips of cut up sari’s double plied and made into beautiful colorful balls of twine or yarn. The balls could be used for decor or for crafting. I wanted to use the twine for Christmas wrapping. I didn’t and the balls have been sitting in a kettle by my fireplace.

That sari cord! Yes, the perfect thing to use on the stool. After securing the base I spent three evenings trying to figure out how to wind and secure all four side at the same time. I needed to create inward pressure on the legs in order to keep the stool together.

I did figure out a way to do that, but felt that I couldn’t continue the pattern until the legs were completely covered. I did decide to go ahead and cover the legs completely. I also figured out how those rush seated chairs are woven in the process.

I’m not finished with the stool yet. But I have one side done. I think it looks I interesting and it will definitely give this chair another few decades of use.

Improv wristlets

My niece and I decided to do a project. She wanted to make a Wallet that would hold her phone. So we decided to just wing it. We needed pockets on the inside to hold money and IDs. And we wanted it large enough to hold her smart phone.
This is what we came up with pockets on the inside…

Swiveling wrist straps…

And our finished product…

MQG is Loving the Improv Charity Quilt We Made

The Balancing Change quilt my guild made for Quiltcon 2016 was truly improvisational from beginning to end.
At each step, we improvised and modified. Even the quilting wasn’t decided until the quilt was on the frame. But at each step we kept basic design theory in mind.

Balancing Changes - San Antonio Modern Quilt Guild 2016 Challenge Charity Quilt , view of quilt front.
Balancing Changes – San Antonio Modern Quilt Guild 2016 Challenge Charity Quilt , view of quilt front.

The Balancing Change quilt my guild made for Quiltcon 2016 was truly improvisational from beginning to end.

We knew we wanted to make a quilt for the Quiltcon Charity Challenge that embodies how random things become organized, how chaos ends up organizing and balancing out in the end. In the greater San Antonio Texas area 2015 saw an overwhelming amount of destruction, Wimberly flooding probably being the worst. I think we did succeeded.

In our first sew-in, we all talked about ideas and we decided a triangle, the symbol of change, would be important imagery. We also discussed traditional blocks that we could use as inspiration, specially the churn dash, as a symbol of change. I saw this an an opportunity for me to get a beta ‘test’ of a improvisational ruleset I am working on to publish (more on that in a future post.) We added a few more rules such as scissors only, no rulers. For at least half of our group, this was a very uncomfortable situation. We all knew this quilt would expand our horizons.

Our first go around resulted in an interesting mess that didn’t inspire us to move further. We looked at it and moved parts around and it just didn’t work. So we let it rest for about a month in order to let our creative juices get to work.

2015-BalancingChange-3
Balancing Changes, view of quilt back.

Sarah Jimenez found a sketch of a black and white triangle with a couple of bars all done in pencil. It began a conversation about the concept of balancing. We considered two bars, but felt that it could be taken as a political statement and we wanted to avoid that even though there is much chaos in politics. We wanted this to be about the abstract concept of changes affecting us and not about a specific idea. Instead of directing the thoughts of the viewer, we wanted our quilt stimulate and open those thoughts.

I had also been reading a lot of design theory and wanted to apply some ideas of depth and movement through relative sizes and layering of objects.
Sarah and I worked together to combine the ideas into the final layout.

Taking the design concept of depth one step further during the quilting process I applied comic book drawing theory. In comic books line value and thickness are often used to indicate depth of field. Thinner lines with color value closer to the background indicates farther away from the viewer while bolder thicker more color value difference indicates closer to the viewer. So I used a variety of very thin 60 wt threads, and thicker 50wt and 40wt threads when quilting. I had planned on using 30wt thread too, but it required mechanically adjusting my machine to accommodate the very thick needle. There was not enough time to get out the tools before the quilt had to be in Pasadena for Quiltcon 2016. I plan on trying the thread weight ideas on a future quilt though. The idea intrigues me.

This quilt really pushed our group to get out of our comfort zone and to really think about improv as a concept that still requires design theory application to get a great results. We are all happy with the outcome. We all learned a lot. I hope this group will do this again!


MQG talks about it on Instagram

#quiltconcharityquilt, #quiltcon, #improvquilting, #quiltcon2016, #quiltconcharitychallenge

There Is A Philosophy of Monoprinting?

Glad I asked me that…

There is serendipity and a leap of faith in the act of monoprinting. Faith is something we all need more of.

Most printmaking is all about making hundreds or thousands of copies of something all the same. Mono printing isn’t like that at all. The genius of monoprinting is that it is a one shot deal. Every print you make will differ.

In mono printing, you spread paint on a surface and transfer it to another surface. You can manipulate the paint in-between if you wish. You can manipulate the surface you put the paint on and you can manipulate the surfaces you press onto the paint. But you can never identically reproduce the exact same chaotic placement of every bit of paint. You can make things similar, but never identical. So you can make coordinating prints that look really good together for triptychs or series of art objects.

All that similar but different concept attracts me to it. Kinda like how I am attracted to people. I love that people are different. If we all were the same and had all the same ideas, and all the same way of doing things, the world would be a really boring place. Monoprinting also appeals to the scientist in me. One of my favorite classes had a section on chaos theory and how organization comes from disorganization. Monoprinting is a bit like that.

You could put paint right on the fabric but it just won’t look the same as monoprinting. You would lose that bit of specialness that monoprinting imparts. There is a spontaneity that we should all have in life and monoprinting is a kind of physical evidence of how a little chaos results in something wonderful.

Monoprinting can also change a fabric, it can tone down one that is too wild or it can add energy and interest to a fabric that is dull or boring. Sometimes a little dab of paint will do it. Same with people, animals, and things. All our experiences rub off on us and change us a little bit. Every encounter we have changes us a bit, every encounter changes the fabric. The more I think about it… there is a philosophy we can learn from monoprinting.

Once I get out of my introspective mood, I’ll write up another post about my low budget monoprinting presentation soon.

Complementary Improv Quilt named Earth, Wind, and Fire

My goal was to do a complementary colored quilt as an exercise in my exploration of the CMYK color wheel. I also challenged myself to pick the ugliest fabric I owned as a starting point.

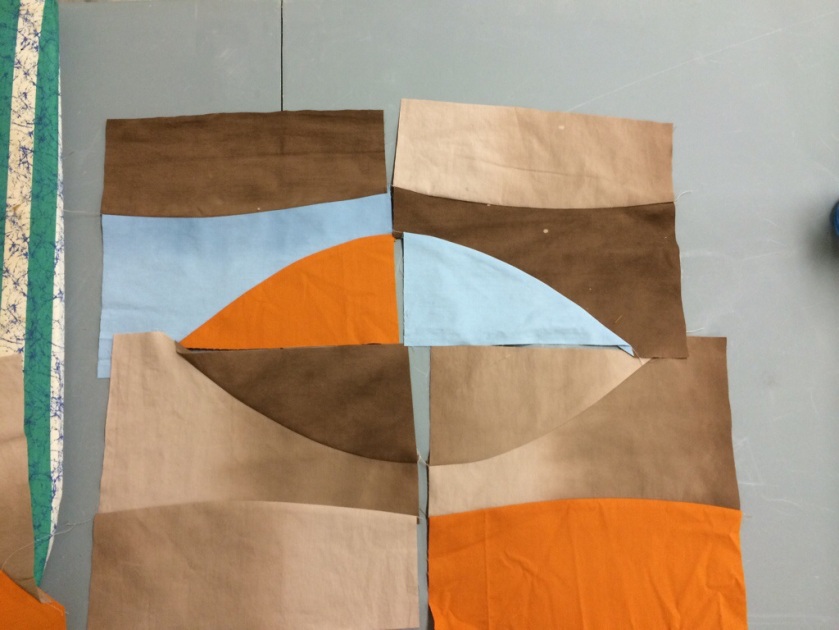
I chose a ombre brown that looked like mud. I bought this on sale a couple of years ago and it never inspired me. I realized that I had a matching ombre blue that worked for a complementary color scheme. Initially I made about 30 blocks that were improvisational created by stacking two squares to five and cutting a curve through all them. I didn’t worry if the fabric shifted, I just used a rotary cutter to slice through all of it. Then I randomly shuffled the pieces and sewed them back together. It did not take long to realize how sleepy this soft brown and blue color scheme made me. It really needed something more. I pulled out Joen Wolfrom‘s color poster and realized that I had an orange that was actually the same color as the brown, just a different value. Wolfram is really changing how I think about color. It’s all about value. Thinking in value really simplifies things.

Bright orange is a very powerful color and in the case of this muted soft blue and brown scheme, it became very powerful indeed. Small doses were in order. I stacked up a few of the blue/brown blocks that had larger areas of contiguous fabric section and layered in an orange square and did my same improvisational curve cutting and piecing. I also sorted through my blocks and found several that were not large enough to allow me to easily square up all the blocks to maximize the sizes I could make. So I tacked some orange onto the edges of these smaller blocks to grow them. I am actually really pleased with these blocks. The fabric that I did not like, now looks like suede and the bits of orange really shape the path the eye travels over the quilt top. It reminds me of a kayaking trip with water, mud and flames.

I really need to put up a large design wall to layout all these blocks. It will have to wait for a retreat or something. I also have not decided if I will sash them like in the three row image or if I will just sew them edge to edge. I’m sure it will come to me at some point.

logo

Creatives Worldwide Blog Hop

As you all know, I’m a fan of Rose Hughes and her fast piece applique method. I have all her books and I can’t recommend them enough for anyone wanting to get into art quilting. She is now participating in a blog hop with this . I decided to follow along too.

Four questions to answer and I think it might clarify some things in my mind.

#1 What am I working on?
I’m working on four projects concurrently. The first is my giant rainbow elephant applique that is currently on my long arm. The second is a first time attempt at a drunkards path. I’m a member of the San Antonio Modern Quilt Guild and so I’m using a ‘modern’ ashy grey solid and mixing it with my beloved batik. All shades of blue in this case. I have no idea how it’s going to come out. Currently the blocks are all over my dining room table while I get inspired as I move them around. Hubby calls this “working on your puzzle”. The third thing I”m working on is a “fast piece appliqued” sea-horse art quilt. My friend Carol wanted to learn how to do it and so we each picked out a scene to do. We’ve got the piecing done but not the couching and quilting. I can never be working on just one thing at a time. I love having something arty that needs embellishing around that is portable so I can work on it in the car or on a plane. The fourth thing on my quilty agenda is outlining and making samples for my free motion quilting class that I’m teaching in November. I decided having some sample of thread tension and speed related issues would be nice to show. I think it’s like doing a foot book or a stitch out of all the stitches one’s machine can do. I’m learning a lot. The process of teaching and prepping to teach is very educational to me. It’s making me grow and be a better quilter myself.

#2 How does my work differ from others in the genre?
I supposed I don’t have a style yet. I’m still learning, trying other’s methods and muxing them together to invent easier ways of doing them. So I don’t know that it differs, other than I really mix it up a lot and you’ll find lots of different techniques on my work. Right now, you probably won’t see anything done the same way twice either. I don’t really like rules. So I suppose free form and rule free is more the way I do things. Though my drunkards path quilt now has a lot of straight lines between the blocks. hmm… guess I’m breaking my personal ‘rules’ too.

#3 Why do I create what I do?
Inspiration comes from everywhere. But most of all, I get inspired when I’m told I can’t do things “that way” or “that’s not going to work” or “no one does it that way” or “that’s not art.” Hearing statements like that just fire me up and make me want to prove that it can and is and is possible.

#4 How does my creative process work?
With my career in coding and web design work, I have always had the philosophy “work hard now, so I can be lazy later.” That translates to thinking about things a lot before starting work. I would rather get it right the first time and have a plan for dealing with the problems than get blind sided by issues later and have to apply a lot of bandaids to the code. Do it right the first time, so it wouldn’t have to be redone a second time. Take the time to do it right. That said, my philosophy, while great for programming, can get in the way of art. What ends up happening is that I tend to ponder on something for way too long before I go for it. But I am not fixed once set on a path. I also tend to switch strides in the middle of a plan and morph it into something else, something better.

I’m tired of geometry in modern quilts

The more I see modern quilt guild type
quilts, the more I like many of them. I like how the actual quilting can create a sense of motion if it’s thought out. I like the quilts that make me think or that make statements even if I don’t like the actual statement they are making. The idea that fabric can evoke emotions is really cool.

However, I am getting tired of rectangles and squares. So many of them look alike. I had a thought a few days ago about how I was tired of geometric patterns and that free form flowing shapes are really interesting to me right now.

So I’m taking three simple fabrics and am going to see what I can do with them. The first two are bland ombré hand dyes in ashy blue and tan. The third fabric is burnt orange that actually is in the same shade as the tan just not diluted w grey like the tan. I’m challenging myself here. Not a single one of my beloved batiks in sight, and a lot of improv free cutting is going to happen. I plan on keeping the geometry to a kind of minimum.
20140521-180738-65258128.jpg

Happy students

John and I completed our freeform table runners this past Saturday. Carol had to leave before finishing and we will finish it up later this week. She picked out some amazing colors of yellow, pinks, oranges and green.

No two table runners ever come out the same because every strip you cut is curvy and done as you are inspired in the moment.

John and I went with colors we can use during the great Watermelon Month of June here in Luling, Texas. Some might say these are Christmas colors. But, here in Luling we know better.

20140223-235130.jpg

Jelly Roll Red Black and White Improvisational Quilt Part 1: The Cutting

I’ve had two Princess Mirah batik jelly rolls in her red, white, and black color scheme for a couple of years. I couldn’t decide what to do with them. Next week my Innova longarm is arriving and I have been putting together a bunch of tops in advance because I know I’ll go longarm crazy for a few months. Since I need more tops, these two jelly rolls are going to be used today! I have decided to not follow a pattern and just do whatever comes to mind with these.

20130721-154058.jpg

20130721-155103.jpg
I started by separating out the red strips, and cutting about a quarter of them in half lengthwise. Then I sewed together randomly chosen strips of black and white fabric strips and inset red a skinny red strip randomly. I just used one red per four of the black and white strips.

Now I have a slight problem. I only had enough black and white strips to make six of these long units. I want to cut them into squares and I am going to need way more to have enough for a quilt. What to do? I do have a lot of plain black fabric that I was going to use in another quilt back. I think I can use it for smashing on this top. But I need more blacks. So I’ll do,the same thing with the red jelly roll strips and take my last two black and white strips cut on half to do a reverse scheme. That will get me some more coordinating blocks. (I ended up with three units that were mostly red.)

20130721-160955.jpg

20130721-160942.jpg

20130721-174452.jpgHmm. I think a bunch of square blocks made up of these units might be boring. So lets chop them up and add a slash of red. I do have all those left over half strips to use up. First I need to figure out what size my blocks need to be. The ends of my striped units are jagged because the lengths of the jelly rolls strips were not the same. The shortest strip was 43.5 inches. 43 minus the selvedges. So I think Imcan get 5 eight and a half inch blocks from each unit. Now I’m gonna be adding some to each block since I want to put random slashes of contrast in them so maybe I can get a little more .nah.. Lets go w five. Off the bat they will be a little taller (9.25) than wide (8.5). But I’ll add more with the slashed and I’ll need to square them up. Let’s see what happens.

20130721-180222.jpgI slashed all the blocks randomly at different angles. See the leftover jagged end I trimmed off? Now to sew in some more of the red half strips and see how it looks.

20130721-182517.jpgI think its pretty good. It’ll be very interesting when I turn some blocks sideways later.

[to be continued]