quilting and life go together like wine and cheese
Author: FreeFormQuilts
South Texas chick who drinks margaritas, makes not boring socks, quilts, leaves her christmas lights up till March (inside the house), and has an opinion on everything. Has a not-so-secret occupation and she also married into one of the coolest ranching families ever.
I was chasing our lawn man. The sprinklers were on so he just drove through our driveway and didn’t stop. I had a lot for him to do (stuff he hasn’t been doing each time, but was on the LIST for our contract, so I really wanted to talk to him). I heard his truck, jumped out of bed, put on my jeans and headed out our bedroom door, ran full blast around the house…
now the day previously we had planted some new trees. i had made a mental note to “get some kind of fabric strips to flag the support lines, tomorrow”
back to lawn guy day….
I ran around the corner of the house and with a full stride slammed my foot, toes spread, right around one of the new tree guy wires. I was catapulted right onto my face in the most fancy face plant you could have ever witnessed.
It’s not over yet.. need a keystone cops style drum roll and penny whistle tune here.
To add insult to injury, I landed on a pile of dog doo, rolled over to grab pain explosion aka foot, and rolled right into another pile of dog poop. The truck driver never saw me and kept going.
I was outside for quite a while both crying from pain and laughing out loud about the whole damn mess when my husband came out looking for me. He was going to save the lawn guy from my wrath, but he puts his pants on slower than I do. He saw me lying there alone and laughing and went back in the house, thinking I was having a ‘moment’ and that I’d explain, or that maybe the dogs were being funny or something.
I discovered it is very hard to get off the ground with just one good foot and the other foot pulsing and throbbing and generally unable to be used. So I crawled over to the infamous tree and used it to pull myself up (it’s a little crooked now, I’m gonna leave it that way as a visible reminder that some little things, like flags on a tree really do matter).
My foot went numb for about four hours, I took a shower and I thought.. I’d get over it.. toes probably broken and it would heal. Later things started to really hurt again and it all turned puple. So went to the emergency room.
An hour later, after probing and Xrays… shattered bones.. bone shards in toe joints… next day orthopedist to see if I’d need surgery. He says too swollen to tell. “Take these pain killers and they’ll get the swelling down and stop chasing people and scoop your poop, come see me in three weeks.” He also taped my toes together so they would stay lined up and not get permanently wonky.
CMYK rules my art world. And, it should rule yours. I have known about and used both RGB (red, green, blue) and CMYK (Cyan, Magenta, Yellow, K (I’ll explain the K later) for years. But I really didn’t understand them until now. I thought CMYK just was something printers had to do because of the inks they used.. and I was kinda right, but mostly wrong. It had to so with the inks, the paper, the coatings, the …well.. the everything.
I’m taking a class is all about CMYK and why it is better than RGB for my art. RGB is what we learned in elementary school only because it is easy to show. RGB is for transmitted light. RGB is about adding colored light together to create. Starting from nothing, the absence of light, adding light of specific colors until you reach your desired outcome.
CMYK is about starting with white light and subtracting colors until you reach your desired outcome. CMYK is for light-absorbing color processes. Quilts, fabric, paints and inks are ‘colored’ by all reflected light. But it is light passed through light-absorbing pigments in the form of ink, paint, dyes, and more. A CMYK color wheel will really help you get the best results when using these mediums. C-Cyan, M-Magenta, Y-Yellow, K- key (the key or color plate is used in printing to determine the lightness or darkness of the CMY). They don’t mention the K part in the class specifically, but they do talk a lot about it. Every time they are talking about tint, shade, or tone.. they are teaching us about the K part of CMYK color theory.
We were all short-changed in K-12 when it came to color theory unless you had a really rocking art teacher who had lots of time. If you took drama classes you necessarily taught RGB. Theater uses light and lots of it. Theater uses light passed through gels (transparent colored films) to “color” the light. RGB is all about transmitted light. It’s really easy to show RGB color theory and limited budgets meant most schools taught RGB theory. A few colored gels, a source of white light and, wa-la, you had an easy quick demonstration on RGM. Lightness or darkness in RGB is controlled by the amount of light you allow to shine through.
CMYK. Now that is the true beast we need to learn for doing art (that isn’t working directly with manipulating the light itself). In CMYK, the lightness or darkness is a result of two things. 1) the pigment itself and how a human perceives it. and 2) the amount of white or black mixed into the pigment). Number 2 is a very different animal than just dimming or turning up the electric current in a light. Human perception is obvious for those of us who can see. For example, Yellow is ‘lighter’ in perception than Purple.
In CMYK color theory, color passes through the pigments/dye/ink on the paper (they absorb some color) then reflects off of whatever surface is under the pigments and back through the light absorbing pigments before going to your eye. So you can think of CMYK as subtractive. Color is subtracted (absorbed) or removed from the light bouncing off the background behind the pigments laying on the surface. It is also affected by the background surface. And, it is subtracted (absorbed) again when the light passes back up through the pigment back to your eye. The background plays a huge role in all this. Traditionally the background is white, white canvas, white fabric, white paper, white gesso, etc.
In CMYK you can create black by mixing all the colors together. In practice, this actually end up looking like a dark mess. That is because it is really hard in nature to find 100% pure colors, or to even create them out of things we find on earth. Everything we create is slightly tainted. So actually finding three pure CMY colors and mixing them exactly has astronomical odds against it happening. Also laying on enough pigment to absorb all the light is a requirement. This could end up looking like a thick scab. This can get really nasty if you ask me. So printers and artists for thousands of years have “cheated” by making black pigments. Actually they are just made of things that are really dense and absorb a lot of light like coal. Anyway, using black pigment with the three subtractive primary colors allows wonderful things to happen. It’s why your inkjet printer today uses at least four inks, Cyan, Magenta, Yellow and Black is used for the key). Black is used when the muddier combo color of the CMY isn’t desired. To get a really rich black, printers will often mix a layer of CMY with a layer of black over it. Newer printers often have a “Photo” black cartridge. This is actually CMY and Black inks together. No biggie.. it just works.
To get lighter ‘colors, you just use less pigment so less absorption of light occurs. This isn’t always practical either. Our eyes are super sensitive detectors. We would have to grind down the pigments to itsy bitsy teensy weensy bits and sometimes we can’t grind them down enough. We’d also have to evenly and at regular spacing spread the pigments out at just the right rate to get the color we want. All that is terribly hard. So again, artists have been “cheating” for years by using “white” pigments as a carrier substance to thin out the colors and spread them out. No biggie.. it just works.
Having the K factor is the Key… it allows us to take a pure color and thin it down to make lighter colors or thicken it up (and even add black) to make dark colors.
You can even include the K factor as your substrate, using a grey or black back ground will allow you to achieve changes without having to even alter your pure color pigments.
All that is nice.. but how does it apply to quilts..
As well as making different color choices now, I think about the K factor (lightness/darkness/value) as much as the color itself. I realized I used to pick all the colors but they usually had the same K factor. So if I made a green and blue quilt (analogous color scheme) I had all light, or all medium colors in terms of how light/dark they were. Because I am studying CMYK, I think about the K factor (lots of pros call it value or include it in their value definition). So now if I were to do an analogous color scheme quilt, I also make sure I have some light, some dark, some medium mixed up in the actual colors themselves.
Does it work? All I can say is that it does! Try it. If you are used to using a color wheel as a guide to help you choose fabrics for a quilt… Go pick fabrics using a CMYK color wheel, also known as an Ive’s Color Wheel, and watch your once drab color picking skills suddenly become professional. Remember the K factor part of CMYK and You’ll be quilting with the stars.. at least with your color choices.
I know people are saying things about my art that they didn’t before.. they are saying things like wow, I love those colors, I didn’t think of putting those together but it really does work well, and more. They never commented about my choices before I made the switch. They do now. And more importantly I think so to.
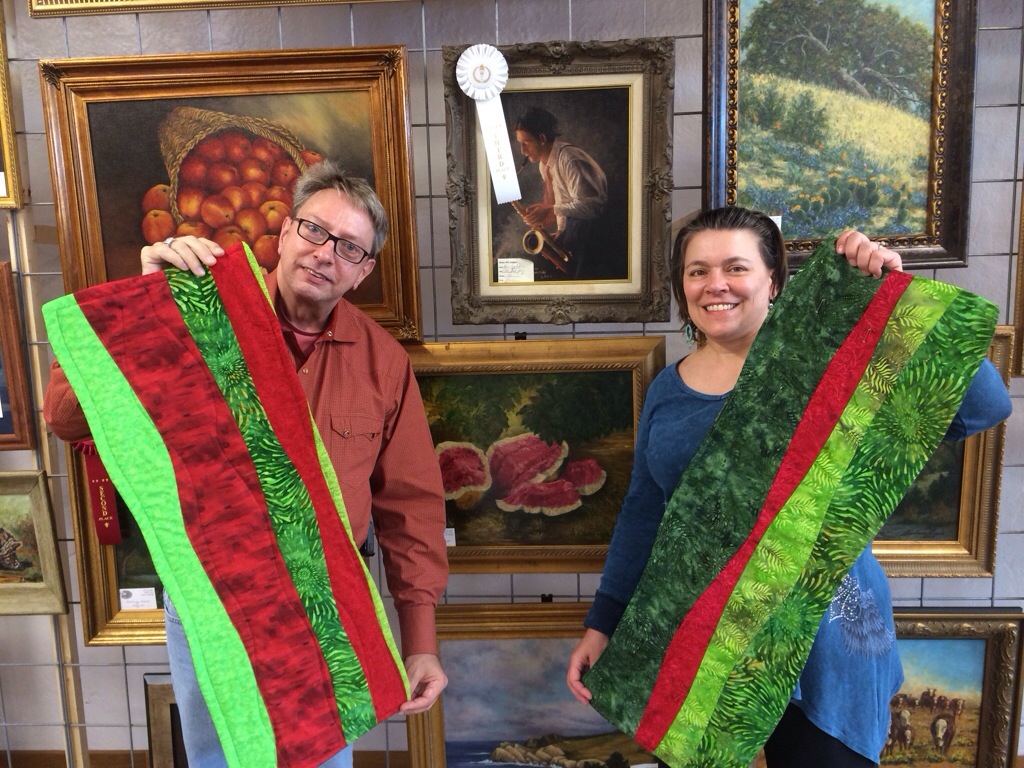
John and I completed our freeform table runners this past Saturday. Carol had to leave before finishing and we will finish it up later this week. She picked out some amazing colors of yellow, pinks, oranges and green.
No two table runners ever come out the same because every strip you cut is curvy and done as you are inspired in the moment.
John and I went with colors we can use during the great Watermelon Month of June here in Luling, Texas. Some might say these are Christmas colors. But, here in Luling we know better.
I have discovered Wonder tape! Love this stuff. If you are doing a pillowcase type finish and just can’t get those pesky edges to fold in and stay aligned, wonder tape is your friend! It is two sides and tacky so you can reposition the cloth to your hearts content and when you are happy you can use an iron to fuse it down to it will stick really hard. Then you can sew it. It’s a convenient 1/4 inch wide so makes getting that seam to match with the other side of the opening you want to close really easy. After you sew it, it will seems kinda stiff with that tape in there. But it sewed easy and didn’t gum up my needle. The wonder part comes after you wash the item. The tape dissolves away and disappears leaving no trace it was ever there!
I used this in my free form table runner class yesterday and the students projects came out fabulous. Even the beginner never ever sewed before student produced a really well done project. You could not tell where the opening was that was used to turn the table runner inside out.
I found these spiral eye needles about two years ago and I have fallen deeper in love with them every time I use one. Pam Turner had an idea and invested her life savings in it because she felt it was so good. I agree with her.
Her easy threading needles blow the Clover top loading (not-so-easy) needles completely away. Pam’s needles are ‘side’ loading.. get that? Side loading. That means the thread goes in from the side. The advantage is the thread isn’t pulled out of the end slot when going through the fabric because THERE IS NO END SLOT. This easy threader stays threaded.
I use this most of all for burying quilt threads on my long arm. But I multiple size of her spiral eye needles and use them for embroidering, beading and other quickie things.
The only minor problem I have found is when embroidering if I have the side slot turned towards the fabric and pull the needle through with pressure. In this situation, once in a while the fabrics weave can get caught in the slot. The advantage of not having to strain my eyes when threading far outweighs this. It’s easiliy solved by spinning the needle so the slot is not pulled against the fabric as I stitch.
As I get older, my eyes switch more slowly from distance vision to close up. Threading needles has become harder and takes longer because of it. The Spiral Eye Needle actually is faster to thread even when my eyes are focusing well. I’ve given a few of them as gifts.
These aren’t the most inexpensive needles you will ever buy, but they are the cheapest if you count the amount of time you spend threading and if your vision is a little bit off they will save you even more time.
I had a professional longarm friend tell me that the spiral eye was too expensive for her to use. I asked her how long it took her to bury threads… 10 minutes to an hour depending on thread changes… Most pros get paid by the square inch. If you could cut the thread burying time to 25% of what you spend now… how many more quilts can you get done. This is a cheap investment for a pro. And for someone like me… it’s a godsend for my eyes, sanity, and patience.
Plus I use one of those little strawberries with sharpening grit. My favorite two year old needle is just as good and sharp as the day I got it.
This is a wonderful display of capitalism working at it’s best. A really fun group of girls building a business that helps artists find rare materials and that also helps women in poor countries get their goods to market. Also it’s green, keeping awesome stuff out of landfills. It’s genuinely helping everyone from the earth, to disadvantaged women, to the owners of the company and even the artists who use the materials they import to the U.S. YES!
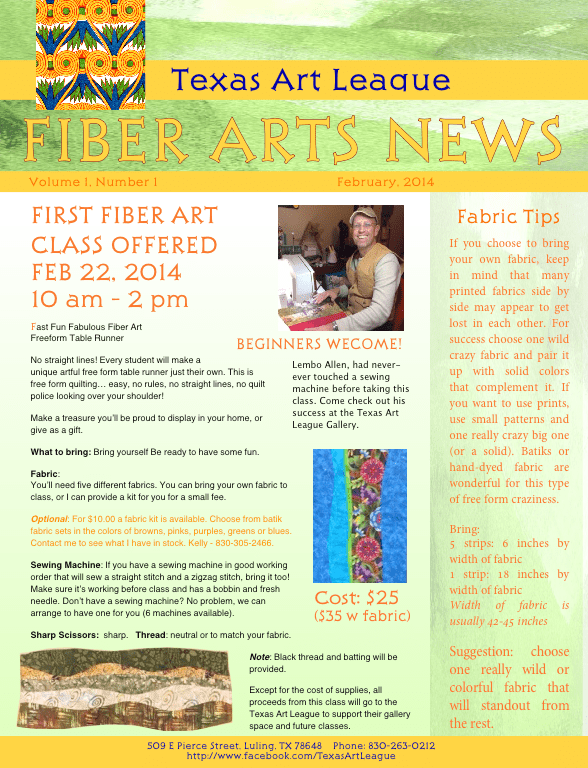
The Free Form Table Runner class being offered Feb 22, 2014 from 10 am to 2 pm. at the Texas Art League Gallery. Sign up at the Gallery. There will be a break for lunch, you can bring your lunch or some students may wish to work on their project so we arrange for lunch from the Coffee Shop, or perhaps a taco run. Iced tea and water available during the class.
Click here for PDF to save and download. For more detailed information, Please click on this image for a pdf you can save and print. This flyer will also be available in the Texas Art League Gallery; and, in the Watermelon Shop next door if the Gallery is closed.
The Gallery has limited hours but is open most afternoons Tuesday – Saturday. They would really appreciate more volunteers who would like docent at the gallery so that it may open more hours of the day.
The Texas Art League Gallery is at at 509 E Davis Street, Luling, Texas 78648.
I’ve put my body where my mouth is and have volunteered to teach a fabric art class. February 22, 2014 will be my big debut. I wanted something that anyone can do, something quilty, and something fun. What to do?
I have so many ideas but some needed a little experience. I tossed around the idea of a fused art piece and that is a real possibility because you don’t have to sew if you don’t want to. The idea of doing self portraits using fabric, fibers and other stuff crossed my mind. But that is probably a 3 or 4 meetings type of thing. A fast piece applique using Rose Hughes technique is on the list for sure. Finally I settled on doing something that looks hard, but really isn’t and can be done in 3-4 hours. We are going to make.. drum roll please… a wonderfully wavy free form table runner.
If my He-man Texas Cowboy husband who has never ever sewn on a machine before can do this, you can too!I needed a crash test dummy to try out my class. I wouldn’t want to get myself or my students in over my head. I needed a never ever sewed in their life ultra beginner. After cajoling and promising delicious food I finally talked my cowboy horse loving Texas he-man husband into it. He had never ever touched a sewing machine in his life before. Perfect!
I set a timer and we started. And.. Viola! He did it! If I add a half an hour for setting up and settling down, the class should do this in three and half hours.
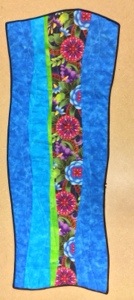
Below are pictures of the he-man’s first quilt and couple of other samples, two use batiks and the third uses a wild design and some textured prints. He wanted red, bright red. I like his fabric choices a LOT!
I suggest choosing one focus fabric, something super bright, crazy, different, or big print. And choose the rest as more solid, or finer textured to go with it. That kind of combo seems to work out best. But there are no rules in this class for fabric choices. If you love it… do it!
What makes this so easy?
No straight lines! You don’t have to sew straight.
What makes this so fun?
Every student will make a unique artful free form table runner just their own. Never-Ever’s and experienced beginners will all be successful.
This is free form quilting… easy, no rules, no straight lines, no quilt police looking over your shoulder!
What to bring? Yourself ready to have fun, learn something new, and take home a wonderful unique artful piece for your home or a gift.
Fabric You will need one piece 15-16 inches wide and 5 pieces of fabric about 6 inches wide cut selvage to selvage (selvages are the edges of the fabric, not the cut edge, this will be about 42-45 inches long).
Optional: for a $10 fee, I can provide a kit of five fabrics for you. Color choices limited to stock on hand. Browns, pinks, blues, greens all batiks.
If you choose to bring your own, keep in mind that many similar printed fabrics side by side may get lost in each other. For success choose one really wild crazy fabric and pair it up with teensy prints or solids that complement it. Batiks or hand dyed fabric are wonderful for this type of free form craziness. Suggestion, choose one really wild or colorful fabric that will standout from the rest. These are only suggestions, if you have a wild crazy idea, just go for it!
Thread is necessary and we will have neutral and black on hand. If you want to use thread to match your fabric, pick a thread which will go with all 5 fabrics you have chosen.
Batting is the stuff that goes inside the quilt to make it have shape and body. We want a thin batting that will take 8-10 inches between quilting stitches. This will hold together better. I suggest Warm and Natural batting or any other that will accept lots of space between stitches. You do not want the all polyester with 3-4 inch between stitches. It will be too puffy for a table runner if you ever wash it, it will puff up.
Sharp Scissors or a Rotary Cutter would be even better. If you have a rotary cutter bring it with a fresh sharp blade. If you don’t know what one is.. that’s okay. Bring scissors, sharp ones. I will have a rotary cutter so you can try it, but the class will have to share if they want to use it.
Sewing Machine If you have a sewing machine in good working order that will stitch a straight stitch and a zigzag stitch, bring it too! Make sure it’s working before class. If you don’t have one, don’t worry, contact me before class and I can arrange to have one available for you (limited to 6 students).
Bobbin filled with thread.
Presser Foot Yes, I forgot to take this vital part of the sewing machine with me to a class once, make sure you have at least the regular straight stitch foot. If you know what a free motion foot is and have used one, bring it. We won’t teach it in class, but you can certainly play around on this project with it.
Except for the cost of supplies, all proceeds from this class will go to the Texas Art League to support their gallery space and future classes.
Example of 5 earth tone batiks used in a freeform table runnerLembo decided to spice it up by choosing a bright red as one of his colors. The red really adds some pop!
(I was asked about fat quarters, if you have them, you will need 7 fat quarters — five for the top of the table runner and two matching for the back. Please cut each of the 5 fat quarters the long way and stitch them into a strip to use in the class. They will make a strip about 9″ x 42″. The last 2 matching fat quarters should be seamed together to make one really fat long strip to be used for the back of the table runner which should end up around 17″ x 42″. Don’t bother to trim these to size. This is freeform and nothing needs to be exact. DO! Remember to cut off the selvage before you assemble them into strips!)
“I have cancer. I’m not dead yet!” was a statement I made many times before, during and even after my hospital stay at MD Anderson.
I am talking about it now because some of my friends are experiencing major illnesses including cancer and it is difficult for them and their families. I hope by sharing my experience, I may help them and their families avoid some of the unnecessary stresses that we went through.
One of my family members would answer questions for me when my friends or doctors would ask questions to me. It was so bad that I couldn’t choose my food, apparently having cancer meant to some people who I couldn’t make any of my own decisions. I couldn’t talk to my doctor and nurses without being cutoff and interrupted, answers that were not mine nor accurate were given to the doctors. I felt like that family member thought I was helpless and like I was already dead. I was exhausted from the cancer and from the surgery and healing processes going on in my body, and it was even more exhausting trying to overcome the family member to communicate to my nurses, doctors, orderlies. I had my speech, I had my brain and I felt like I was being totally dismissed and disempowered. It was disrespectful of me, it was a horrible feeling. I tried to convey my feelings to that person, and it seemed as if I was heard, but it kept happening. At first I questioned myself… was I sicker that I thought?
Cancer is pretty icky, but seriously my cancer was not infecting my brain speech center and I could talk. So… Nope, I wasn’t incapable of communicating… I was just slow at it because I was tired. I got frustrated of being prevented from communicating. That frustration grew and I got angry. I was not a nice person at times. Then, finally I cried for real, out of the frustration and anger. But anger didn’t help solve anything. If anything it made things worse because I appeared to be “losing it”. That just made my family try harder. It was a vicious cycle.
Finally one day, when that family member was in the bathroom, I called the nurse into my room and asked her to ban that family member. She was a bit incredulous. I asked her to get a social worker or family psychologist and have them come, I wanted to speak to the shrink before that family member could come back into my room. I felt horrible, but I had to so something.
Finally, I was able to explain my feelings and the counselor was able to talk to my family. That family member expressed that they were only trying to care for me, to help me rest, to take the burden off. The counselor tried to help that person realize that even though, Yes, I was tired, and Yes, it took me a little longer to answer the questions, that they were not helping me and that they were not respecting me, they were making me feel totally helpless and frustrated and thus angry. My family felt totally helpless too. They were just trying to help.
Disempowering a patient who wants to take part in their own care can be very harmful for their healing process. You may not know you are doing it.
The counselor explained that behavior was actually making me feel sicker and more helpless than I was. The counselor explained that my family needed to pay attention to me when I told them, “I can answer”, “stop talking for me”, “I have a brain, stop talking. I want to make these decisions”, or “please go away, I want some quiet and privacy”. The counselor helped me realize, I was the one sick and I was the one that needed rest and respect and that it is OKAY to want alone time. And, I could nicely ask for the space, that I shouldn’t feel like I was a bad person because I needed it and finally that it was definitely ok to demand that and get the nurse to help me reinforce it.
This situation really is about you, the patient, and what you need.
The situation got a little better and in the future when I got tired of it all, I politely asked my family to leave my hospital room and they listened more often. Sometimes I asked them to get me a drink, or some food, or something else. Sometimes I simply asked them to go take a break for a while. Usually they respected those requests. But sometimes they ignored my polite verbal indicators that I wanted some space and so once in a while I called the nurse. We got through it.
I believe, we actually built more respect for each other because of it. I don’t doubt they love me. I also believe they finally saw me as an adult for the first time (I was in my late 30’s when this happened). I learned it’s okay to need people and it is also sometimes necessary to get a third-party (like a counselor) involved, when communication breaks down. It can really improve situations. Hospitals have specialists just for these situations. Use them, that is what they are there for. This situation really is not uncommon at all.